EASY FRONT SPLIT PROGRAM Part 1

Jon Engum performing the splits while pressing a kettlebell.

The front splits are important to the longevity of your movement. Besides the cool factor, the front splits are an important addition to your current ease of movement program.

The front splits focus directly on the hamstrings and the hip flexors at the same time making it a big bang for your buck movement.  Just ask almost any doctor and they will tell you one contributing factor in lower back, noncontact injuries, is tight or weak hamstrings and hip flexors.

Focused training on the front splits and the supplemental exercises will go a long way to help “bulletproof“ your back.

Follow this program patiently to the letter and I’m sure you will be very happy with results.

Flexibility Training Takes Patience

When you participate in one of our Flexible Steel certifications we give you some amazing instant gains, but for long term sustainable results training must be in the moderate intensity range and consistent.  A moderate program with 100% compliance will yield far better results than an advanced intensive program that is not followed precisely.

That said, we will break this program into 2 – 6 week phases, a preparatory phase and a focused front split phase.

Phase I: Preparatory Phase

During the initial phase we will hit the major players with a moderate training program designed to prepare you for more intense focused front split work to follow in phase II.

The Power Tools

Flexible Steel offers many different Power tools to soup up the results of your standard stretching movements. During this program we are going to take advantage of a combination of just two different power tools: Mini contractions and relaxed stretching, a.k.a., waiting out the tension.

A mini contraction is exactly what it sounds like. Put your muscles into a stretch position to the point where you just start to feel a stretch. Then, lightly contract the stretching muscles just enough to move yourself slightly out of position.  Relax and repeat the cycle for 10 repetitions. This is not a heavy duty isometric contraction, rather just a twitching of the targeted muscle groups. Each mini contraction will consist of a rhythmical cycle held for about one second and then relax for 1 second. Muscle power on, muscle power off.

After 10 mini contractions, relax and move a little deeper into the stretched position. Hold the static relaxed position for 15 seconds. Don’t guess, you need to actually count to 15.

A combination of 10 mini contractions and a 15 second relaxed hold constitutes one rep. You will repeat this for three reps and this will constitute one set. Remember this ratio: (10 mini contractions and a 15 second relaxed hold.) X3.

The Moves

Phase 1 will include exercises to target the following:

Calves

Hamstrings

Quadriceps

Hip flexors

1. Calf Stretch

The Calf Stretch is best performed with your shoes on so not to stress your foot too much.

  • Find a step, block, stair or similar object.
  • Stand with the ball of one foot on the edge of the stair and the rest of your foot hanging off in the air.  Yes, that does rhyme.
  • Lower your heel until you feel stretch in your calf.
  • Now contract your calf muscles to raise yourself up a couple inches. This is one mini contraction.
  • Repeat for 10 times.
  • Let your heels sink deeper into the stretch and hold that position for the count of 15. Repeat the combination of mini contractions and relax stretching for two more cycles.
  • Switch feet into the other side.

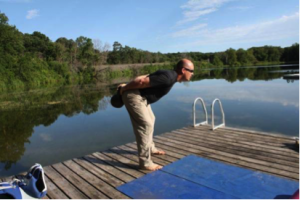
2. Hamstring Stretch

  • Place the heel of your foot on a table, bar, or post that is slightly higher than your waist level.
  • Either pad your heel or wear shoes so you’re not distracted by pain in the back of your heel.
  • The toes and knee of your airborne legs should be pointed directly to the sky.
  • Keep your knee straight.
  • The knee of the standing leg should also be straight. Your knee and toes should track.
  • Keeping a big chest, place your fingers in the crest of your hip. Using your fingers as a guide fold forward at the hip.
  • It is important to note the only movement is coming from your hip. Do not round your back.
  • Once you feel stretching in the hamstrings, begin to perform your mini contractions buy driving your heel into the table causing you to rise slightly out of the stretched position.
  • Relaxing move deeper into the stretch. This is one mini contraction.
  • Repeat 10 more times.
  • After the 10th contraction move deeper into stretch position and statically hold for 15 seconds.
  • Repeat for three rounds.

3. Quadriceps Stretch

  • Bend your knee so your foot goes behind you and your instep is placed on the bench, bar or other similar support about waist high.
  • Keep your knees close together.
  • Squeezed the glute on the airborne side.
  • Tighten up your quads to slightly pull yourself out of the stretch and then relax and move further into stretch. This is one mini contraction.
  • Repeat 10 more times.
  • After the 10th contraction move deeper into stretch position and statically hold for 15 seconds.
  • Repeat for three rounds.

4. Hip flexor Stretch

  • Get into a half kneeling position.
  • The knee of your right leg and instep of your right foot are facing down, in a straight line and on their own railroad track.
  • Your left foot is on the left railroad track.
  • Your hips should be squared off and level.
  • Do a hip tilt.  Imagine your beltline is the rim of a coffee cup, tilt your hips in such a way that the coffee would pour out the back of your “cup.”
  • Take both hands and put them on your hips and move your hips forward to increase the feel of the stretch.
  • If the knee of your front leg starts to travel past your foot, simply slide your front foot forward a bit to adjust this.
  • Once you feel stretching in the hip flexors , begin to perform your mini contractions buy driving your down knee forward  into the ground which will cause you to move out of the stretch a bit then relax and move deeper into the move.
  • This is one mini contraction.
  • Repeat 10 more times.
  • After the 10th contraction move deeper into stretch position and statically hold for 15 seconds.
  • Repeat for three rounds.

The Program

These exercises will be performed as a short circuit. Some days you only have to do one circuit while other days you will perform the circuit two to three times. Do one round of each exercise and this will constitutes one circuit.

The six week program will shake out like this. You will train four days a week. You may insert this stretching program after your regular strength training/sport practice or, as a standalone program. If you use it as a standalone program, make sure to do your mobility drills prior to doing the intense stretching.

Further Explanation

1. Number of days should be self explanatory.

2. Intensity stands for how hard your mini contractions are.

3. L equals light contraction. In other words just barely contract your muscles.

4. M equals medium contraction. So contract the muscles harder than you would during late days but not as hard as you possibly can.

5. H equals hard contraction. Contract stretching muscles is hard as possible.

 6. Circuit means how many rounds you will do of the program.

7. X means no stretching on this day.
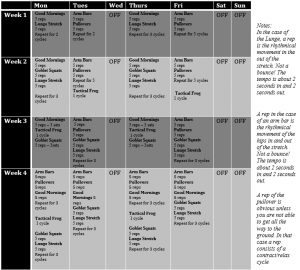
Weeks 1-2

Day1234567
IntensityLLXLLXX
Circuits11X11XX

Weeks 3-4

Day1234567
IntensityMHXLMXX
Circuits23X12XX

Weeks 5-6

Day1234567
IntensityMHXLMXX
Circuits33X33XX

The 4 Weeks to Flexible Steel Program

by Jon Engum

What would more usable range of motion do for your sports performance? Imagine not having to fight your own body. Imagine owning unhindered fluid movement that was at your beck and call.

How much more enjoyable would life be if you could recapture the vibrant mobility of your youth? Understand I am not talking about the weak flexibility of a guy who can tie himself into knots at the expense of his strength and power.Oh, no! I am talking about strong, powerful, usable flexibility that will aid you in your everyday life and sports performance. Interested?

Follow this simple 4 week program and I guarantee you will get amazing results and be well on your way to becoming like Flexible Steel. Give me four weeks (that’s sixteen sessions total) and I will breathe new life into your high mileage body.

First: A Paradigm Shift

The late, great Jack Lalane could easily be considered the godfather of fitness. Jack was way ahead of his time. He did not train clients, he taught students. He did not work out, he practiced. His training sessions were called lessons not workouts.  We can learn much from this seemingly random change in wording. It is in fact not random at all, but craftily chosen to make a very important point. Do not mindlessly chase sets and reps, poundage and times, rather go to the gym, field, track, whatever and try to get better at something. Try to learn a lesson try to improve your technique form. Try to learn something. What happens when we shift our thinking like this is we naturally hit PRs, we keep our mind and body engaged and we keep injuries at bay.  It bears repeating go to a practice or a lesson, not to a workout. Learning keeps one young.

The Lesson:  The Four Knots

My friend and colleague Dr. Mark Cheng calls the hips and shoulders the four knots of the body. While this may be common knowledge in Eastern medicine, it is not so common here in the West. The four knots have several meanings. Let me explain: The shoulders and the hips tie the arms and the legs to your body, this is obvious. But to take the knot analogy further, in order to function properly a knot cannot be too loose – it comes undone and your shoe comes off, or it’s too tight, in which case you cannot untie it and you cannot ever remove your shoe. In order to have a functioning knot you must have a perfect balance of strength and flexibility. You must be like Flexible Steel. Flexible Steel bends, but does not break.

HIPS AND SHOULDERS

For the next four weeks our lesson will be on gaining more flexibility and mobility in the hips, T-spine, and shoulders. Why? Because we will get a very big bang for our buck if we can make even small improvements in these key areas. It had been said “An athlete must move from their hips first.” Gray Cook the founder of the Functional Movement Systems (FMS) calls the hips a BAD neighbor. Meaning if you do not have strong mobile hips your knees or lower back must compensate. Anyone’s knees or lower back hurt?

The four week plan I am posting here is designed to be done in the morning before your normal training. You may still do whatever other exercise or activity is on your schedule, but do this first. Do not consider it a warm-up or a workout but rather a movement lesson or practice.

The Moves

The following descriptions are excerpts from my book Flexible Steel on how to execute these movements:

The Kettlebell Goblet Squat

Dan John, author and strength coach extraordinaire, developed the Kettlebell Goblet Squat. We have found that a month or two of practicing this form of squatting has a dramatic opening effect on the hips and T-spine. It will boost your regular squat performance – no matter if front squats, back squats, or whatever other variation of the squat is your huckleberry.

Grab a kettlebell by the handle, kind of like grabbing onto a steering wheel. Pavel calls this “taking the bell by the horns.” Squat down by sitting back and down between your heels.

Jon Engum Squat

Jon Engum Squat 2

The following goes without saying, but I will say it anyway

  • Make sure your knees line up and stay lined up with your toes. Your knees must point the exact same way your toes do through the whole squat.
  • Keep your heels on the ground and your shins vertical.
  • Keep your back straight; do not allow your tailbone to tuck under at the bottom of the squat.
  • Keep a “big” chest, especially at the bottom.
  • At the bottom, place your elbows to the insides of your knees without losing the alignment of your back.
  • Use your elbows to push the knees out to help open your hips.
  • Your feet must stay firmly fixed to the ground.
  • Make sure when you ascend that your hips and shoulders come up at the same time.
  • Do not lead or “hitch” with your hips.”

Use the goblet squat as an exercise in mobility as well as stability. Hang out in the bottom position for a while. Rock side to side, make some small figure eights, really open the hips, and elongate the spine and try to make space inside your body.

The Kettlebell Good Morning Stretch

One of the easiest and most effective stretches I know for the hamstrings is the Good Morning stretch and its several variations. Here is an extremely effective variant of the classic Good Morning.

Jon Engum Good Morning

Jon Engum Good Morning 2

Quick Tips: Stand completely upright, feet about shoulder width apart.

  • Hold a kettlebell behind your back so that it rests more or less on your tailbone.
  • Puff your chest out,big chest, and let your knees be “soft”. It is not necessary or desirable to have them locked.
  • Moving from your hips, try to push the kettlebell back with your tailbone while keeping your back straight and chest “big.”
  • Do not worry about how far you bend over; this is not a toe touch. Just be concerned about how far back you can move the kettlebell. It is a hip hinge.
  • If you perform this move to the letter, you will feel a very intense stretch in the hamstrings just below your cheeks, not the ones on your face either.

The Lunge Stretch

Jon Engum Preforming a Lunge

How to do the lunge:

  1. Get into a lunge position by kneeling down on your right knee. The instep of your right foot will also be on the ground.
  2. Make sure to align your knee and back foot so they fall on the same line. Your front foot will be on its own line and your left knee will be in the air.
  3. Make sure your left shin, in this case, is vertical and your knee is tracking your front foot.
  4. Do not let your knee get in front of your toes.
  5. Keep your hips square. If you can imagine that you have headlights on the crests of your hips, just make sure they both shine straight ahead.
  6. Now put your hands behind your back and push your hips forward. You should feel a stretch in the area of your front thigh and hip, kind of where your front pocket is.
  7. Push into and back out of the stretch using a rhythmical movement. The tempo should be 1 second forward and 1 second backward.

Quick Tips:

  • Contract the glute of the stretching side to a) protect your back and b) relax the hip flexors through reciprocal inhibition.
  • If and when your knee begins to creep in front of your toes, simply re-position your front foot into a deeper lunge.
  • Sigh when you are moving into the stretch and this will help relax the target muscles.
  • Tilt your hips up, posterior tilt, before you even begin to stretch, to put the target muscles into a nice pre-stretch. This will further your efforts.

The Arm Bar

The effect of the Arm Bar on the shoulders, T-spine and all around posture is apparent as soon as you perform the movement. You can instantly feel a dramatic improvement and an opening throughout your entire body. Let’s examine the classic Arm Bar technique. The Arm Bar starts out the same as its more familiar cousin the Turkish Get Up. I write this assuming you already know how to do a Get Up. If you do not know the Get Up then stop reading now and get thee to an Instructor and learn the Get Up.

  1. Lie on the floor with a light kettlebell on your right side.
  2. Grab the kettlebell with a pistol grip, right hand on the inside and left on the outside, pull your elbow to your ribs.
  3. Roll onto your back prying the kettlebell up as you go. Now using both arms press the bell into the firing range position just as you would for the Get Up.
  4. Things start to differ from the Get Up at this point.
  5. Your left arm goes over your head (horizontally) while you are keeping the kettlebell or “working” arm perpendicular to the ground (vertically.)

To quote Pavel Tsatsouline, “Using your left arm and leg as the axis of rotation and leaving the right arm with the kettlebell straight and vertical bring your right knee towards your chest and roll to your left. Straighten out your right leg and lay it on the ground. Your feet should be a shoulder’s width apart or wider, your knees straight, your toes pointed.”

At this point in the movement you will have four primary things to focus on:

Points to focus on while preforming an arm bar

  • Focus #1 -The kettlebell and working arm must maintain vertical (keep the kettlebell arm vertical in all planes without actually looking at the bell.) Rest your head on the left arm.
  • Focus #2 -Rhythmically begin pumping your hips, trying to get the right hip, in this example, to the ground. It will help to contract the right glute, and breathe, sighing into the extension. The timing should be one rep every two seconds.
  • Focus #3 -Try to make your right collar bone or chest area longer.
  • Focus #4 -Wiggle the left arm (the one on the ground) further and further behind you. Think of stretching the lat.

When you have had enough sloooowly reverse the above process under full control.

The Kettlebell Pullover

The kettlebell Pullover is another often overlooked but nonetheless a powerful posture changer. This innocent looking drill will have a dramatic effect on your ability to achieve that nice overhead lockout on your presses, jerks, snatches etc. As well as a profound impact on your overall posture. Here is how to do it:

Conduction a pull over step 1

Conducting a pull over part 2

  1. Lie down on your back.
  2. Grab a light kettlebell with both hands; hook your thumbs through the handle in such a way that allows the body of the bell to rest on the insides of your forearms.
  3. Press the bell straight up over your chest – kind of like a bench press.
  4. Engage your lats and lock your elbows. They must stay locked and your lats must stay on throughout the maneuver.
  5. Now slowly lower the kettlebell back and down in an arc so it winds up above your head on the ground.
  6. Take a breath contract and reverse the arc to “pullover” and end up above your chest. Repeat for between 5 and 10 reps.

Note: If you cannot make it all the way to the ground without your shoulders coming unpacked or without bending your elbows then go only as far as you can and do some contract/relax stretching letting the weight of the bell take you down several inches with each relaxation. Be conservative. You may go deeper on each consecution set. With time you will be able to handle the pullover proper.

The Tactical Frog

The Tactical Frog is a magic bullet for gain some incredible control over your hips and improving your overall squatting performance. It has a dramatic effect on almost any athletic movement.

Video Tactical Frog

 Pavel Macek Flexible Steel Instructor Specialist Demos the Moves

Untying the Four Knots Program

I will start this program off very easy because I would rather have something simple and 100-percent compliance than something complicated and half hearted adherence. Four sessions will be posted each week, for the next four weeks. Do them on whatever days suit you best, but do them. And have no fear, by the end of week four you will gain momentum and be doing the full program.

The Four Knots program

Printable program: http://flexiblesteel.com/wp-content/uploads/2019/10/Untying-the-Four-Knots-Program.pdf

Chinese Translation http://flexiblesteel.com/chinesetranslation/

Czech Translation http://www.kb5.cz/2016/12/4-tydny-k-flexible-steel-program-video-soutez/

Italian Translation http://flexiblesteel.com/blog/2016/12/29/programma-di-quattro-settimane-per-diventare-flexible-steel/

Polish Translation  http://flexiblesteel.com/blog/2017/01/01/polish-translation-of-4-weeks-to-flexible-steel-program/

Spanish Translation http://flexiblesteel.com/las-4-semanas-al-programa-de-flexible-steel/

What would more usable range of motion do for your sports performance? Imagine not having to fight your own body. Imagine owning unhindered fluid movement that was at your beck and call.