Italian Translation by Laura Callegari – Flexible Steel Instructor Specialist
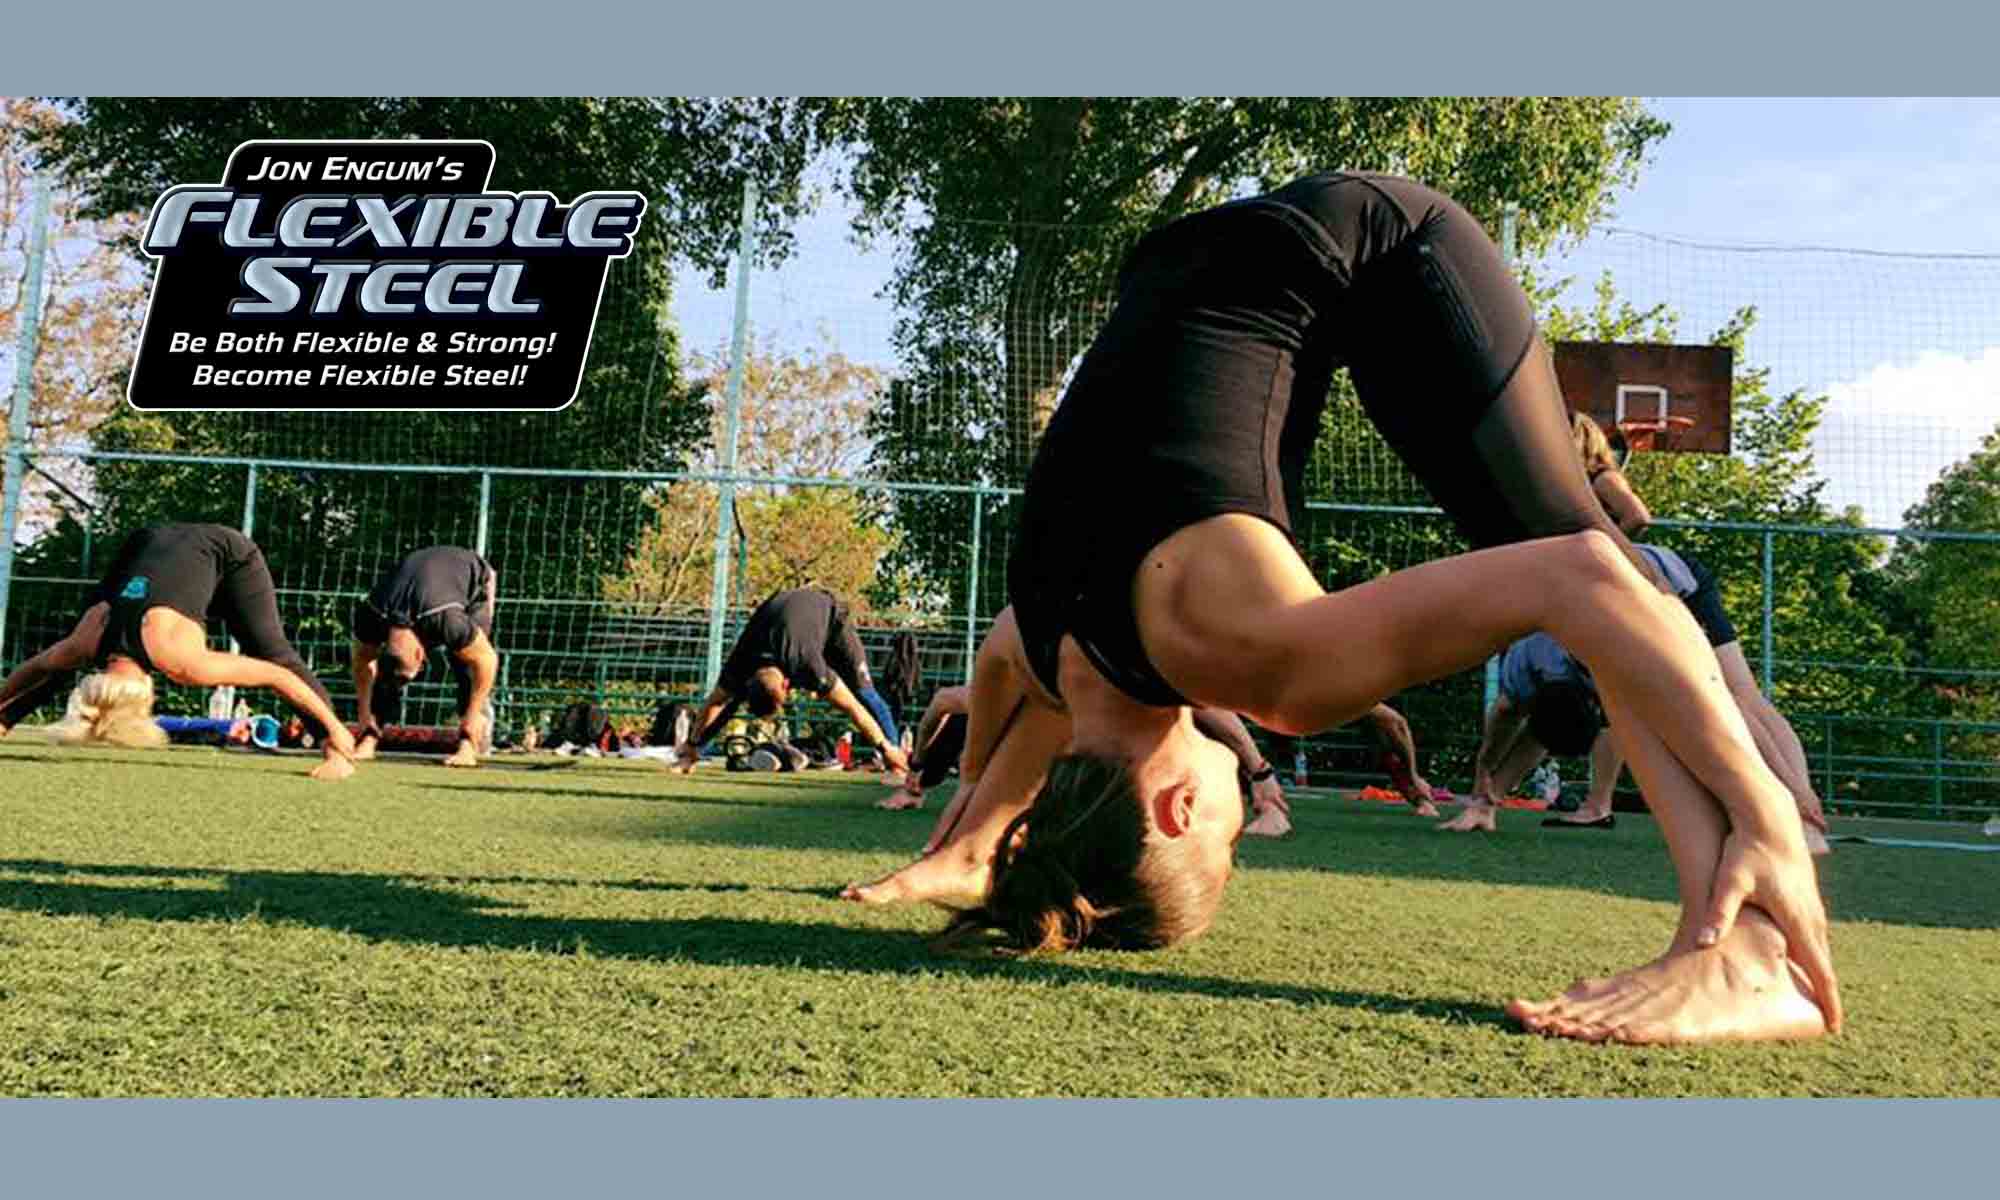
Flexible Steel: programma di quattro settimane
Cosa potrebbe portare alla vostra performance sportiva un arco di movimento più utilizzabile? Immaginate di non dover combattere contro il vostro corpo. Immaginate di possedere un movimento fluido e senza ostacoli che sia sempre a vostra disposizione.
Quanto più divertente sarebbe la vostra vita se poteste riavere la vibrante mobilità della vostra giovinezza? Capiamoci, non sto parlando della debole flessibilità di una persona in grado di annodarsi su sé stessa a discapito della propria forza e potenza. Oh, no! Sto parlando di una flessibilità forte, potente, utile, che vi aiuti nella vostra vita quotidiana e nella performance sportiva.
Vi interessa? Seguite questo semplice programma di 4 settimane e vi garantisco che otterrete risultati grandiosi e sarete sulla buona strada per diventare acciaio flessibile (Flexible Steel). Datemi quattro settimane (sono sedici sessioni di allenamento in totale) e infonderò nuova linfa alla carrozzeria del vostro corpo.
Primo: un cambo di modello
Il grande Jack Lalane può essere tranquillamente considerato il padrino del fitness.
Jack era molto avanti. Non allenava clienti, allenava studenti. Non si eseguiva workout, faceva pratica. Le sue sessioni di allenamento erano chiamate lezioni e non workout. Possiamo imparare molto da questa apparentemente casuale scelta di parole.
Difatti non è per nulla casuale, ma è un’abile scelta per arrivare a un punto molto importante. Non rincorrete serie, ripetizioni, carichi e tempi in modo casuale, andate piuttosto in palestra, sul campo o in pista, ovunque, e provate a migliorare in qualcosa. Cercate di imparare una lezione, cercate di migliorare la vostra tecnica. Cercate di imparare qualcosa. Ciò che succede quando cambiamo il nostro modo di pensare andando in questa direzione è che naturalmente raggiungiamo dei Personal Record, manteniamo mente e corpo collegati e ci teniamo lontani dagli infortuni. Vale la pena ripetere di andare a far pratica o di andare a una lezione, non a fare un workout. Imparare vi mantiene giovani.
La Lezione: I Quattro Nodi
Il mio amico e collega Dr. Mark Cheng chiama le anche e le spalle i quattro nodi del corpo. Mentre questa definizione può essere comune nella medicina orientale, non lo è qui in Occidente. I quattro nodi hanno vari significati. Ora mi spiego:
Le spalle e le anche collegano le braccia e le gambe al vostro corpo, questo è ovvio. Lasciate che vi spieghi questa analogia: per poter essere utile, un nodo non deve essere troppo lasso -se si disfa perdete le scarpe – ma non deve essere nemmeno troppo stretto – altrimenti non riuscireste a slacciarvi e a togliervi le scarpe -. Le caratteristiche di un nodo funzionale sono un perfetto equilibrio tra forza e flessibilità. Dovete essere come acciaio flessibile. L’acciaio flessibile si piega, ma non si spezza.
ANCHE E SPALLE
Per le prossime quattro settimane la nostra lezione sarà rivolta a guadagnare più flessibilità e mobilità nelle anche, nel tratto dorsale della colonna vertebrale (T-spine), e nelle spalle. Perchè? Perchè avremo un grande risultato con un minimo sforzo, se otterremo anche dei piccoli miglioramenti in queste aree.
È stato detto “Un atleta deve muoversi per prima cosa dalle anche”. Gray Cook, il fondatore del Functional Movement System (FMS), chiama le anche il CATTIVO vicino di casa. Vale a dire che se non avete anche forti e mobili, le vostre ginocchia o la vostra bassa schiena dovranno compensare. A nessuno fanno male le ginocchia o la bassa schiena?
Il programma di quattro settimane che sto condividendo qui è pensato per essere svolto al mattino prima del normale allenamento. Potrete fare comunque ogni altra attività o esercizio previsti dalla vostra programmazione, ma per prima cosa fate questo. Non consideratelo un riscaldamento o un workout, piuttosto consideratela una lezione di movimento o pratica.
I Movimenti
Le descrizioni di seguito riportate sono estratte dal mio libro Flexible Steel, dove spiego come eseguire i seguenti movimenti:
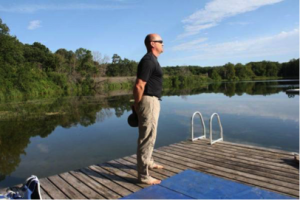
Il Goblet Squat con Kettlebell
Dan John, straordinario autore e allenatore della forza, ha sviluppato Il Goblet Squat con il Kettlebell. Abbiamo visto che uno o due mesi di pratica di questo tipo di squat porta ad un incredibile effetto di apertura alle anche e alla zona toracica. Migliorerà la vostra prestazione nel vostro squat – non importa se si tratta di front squat, back squat o qualsiasi altra variante di squat sia la vostra -.
Prendete un ketllebell dal manico, quasi come per afferrare un volante. Pavel dice “prendi il kettlebell per le corna”. Eseguite lo squat sedendovi tra i vostri talloni.
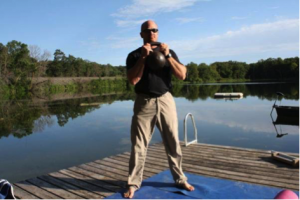
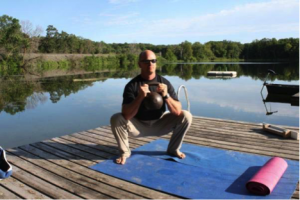
Il resto è sottinteso, ma lo dirò lo stesso
- Assicuratevi che le ginocchia siano allineate con i piedi. Le ginocchia devono puntare esattamente nella stessa direzione dei piedi per tutta la durata dello squat.
- Mantenete i talloni a terra e le tibie (quasi) verticali.
- Mantenete la schiena eretta; non permettete all’osso sacro di piegarsi quando siete nella parte bassa dello squat.
- Mantenete il petto aperto, specialmente quando siete nella parte bassa.
- Quando siete nella parte bassa, appoggiate i gomiti all’interno delle ginocchia, senza perdere l’allineamento della schiena.
- Usate i gomiti per spingere in fuori le ginocchia, al fine di aiutare l’apertura delle anche.
- I piedi devono restare piantati sul pavimento.
- Assicuratevi che nella salita le anche e le spalle risalgano contemporaneamente.
- Non permettete alle anche di prevalere.
Usate il goblet squat come esercizio sia di mobilità, sia di stabilità. Rimanete nella posizione bassa per un po’. Spingetevi da un lato all’altro, disegnate delle piccole figure a forma di “8”, aprite davvero le anche, e allungate la colonna, cercando di creare spazio nel vostro corpo.
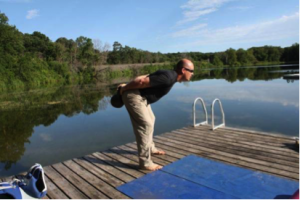
Il Good Morning Stretch con Kettlebell
Uno dei più facili ed efficaci allungamenti per gli ischiocrurali che io conosca, è il Good Morning Stretch con le sue numerose varianti. Qui di seguito avete una variante estremamente efficace del classico Good Morning.
Consigli pratici:
Disponetevi in posizione eretta, con i piedi circa all’ampiezza spalle.
- Tenete un kettlebell dietro di voi, facendo in modo che stia più o meno all’altezza dell’osso sacro.
- Gonfiate bene il petto, sbloccate le ginocchia. Non è necessario né richiesto tenerle bloccate.
- Facendo partire il movimento dalle anche, cercate di spingere indietro il kettlebell, mantenendo la schiena dritta e il petto “aperto”.
- Non preoccupatevi di quanto riuscite a piegarvi; non dovete toccarvi le punte dei piedi. Concentratevi solo su quanto indietro riuscite a spingere il kettlebell. È un movimento imperniato sull’anca.
- Se eseguite questo movimento alla lettera, sentirete un allungamento intenso degli ischiocrurali, subito sotto ai vostri glutei.
Il Lunge Stretch (allungamento in affondo)

Come eseguire l’affondo:
Portatevi in posizione di affondo, inginocchiandovi sul ginocchio destro. Anche il collo del piede destro è a terra.
- Assicuratevi di allineare il ginocchio e il piede in appoggio indietro, in modo che siano sulla stessa linea. Il piede in appoggio frontale sarà sulla propria linea e il ginocchio sinistro punterà in avanti.
- Assicuratevi che la tibia sinistra, in questo caso, sia verticale, e che il ginocchio sinistro sia allineato al piede.
- Non lasciate che il ginocchio vada oltre il piede.
- Mantenete le anche allineate. Immaginate di avere dei fari sulle creste iliache, dovrete assicurarvi che puntino entrambi in avanti.
- Ora mettete le mani dietro la schiena e spingete i fianchi in avanti. Dovreste sentire un allungamento nella parte anteriore della coscia e dell’anca, circa dove ci sono le tasche.
- Spingetevi avanti e indietro usando un movimento ritmico. Dovreste andare al tempo di 1 secondo in avanti, un secondo all’indietro.
Consigli pratici:
Contraete il gluteo del lato in allungamento per: a) proteggere la vostra schiena, e b) rilassare i flessori dell’anca attraverso il fenomeno dell’inibizione reciproca.
- Se e quando il vostro ginocchio dovesse sporgersi oltre la punta del vostro piede, semplicemente riposizionate il piede in appoggio frontale per un affondo più lungo.
- Espirate quando andate in allungamento, questo aiuterà a rilassare i muscoli-obiettivo dello stretch.
- Inclinate le anche verso l’alto, portando il bacino in retroversione, ancora prima di iniziare l’allungamento, per portare i muscoli in pre-stiramento. Questo renderà i vostri sforzi più efficaci.
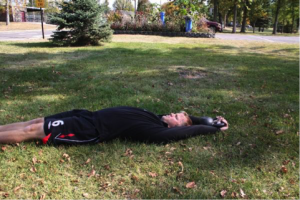
L’ Arm Bar
L’effetto dell’Arm Bar sulle spalle, sulla T-spine e sulla postura in generale, è evidente non appena si esegue il movimento. Potete sentire immediatamente un miglioramento impressionante, e un’apertura di tutto il corpo.
Esaminiamo la tecnica dell’Arm Bar classico. L’Arm Bar inizia allo stesso modo del suo più familiare cugino, il Turkish Get-up. Lo scrivo dando per scontato che sappiate già come eseguire un Get-up. Se non siete in grado di eseguirlo, fermatevi e rivolgetevi ad un istruttore SFG per impararlo.
Sdraiatevi a terra con un kettlebell leggero sul vostro lato destro.
- Afferrate il kettlebell con una presa a pistola, con la mano destra all’interno e la sinistra all’esterno, e tirate il gomito alle costole.
- Ruotate sulla vostra schiena portando con voi il kettlebell mentre lo fate. Ora, usando entrambe le braccia, portate il kettlebell in posizione di tiro come fareste per un Get-up.
- A questo punto le cose incominciano a cambiare rispetto a un Get-up.
- Ponete il braccio sinistro sopra la vostra testa (orizzontalmente) mentre state tenendo il kettlebell – o “braccio che lavora” – perpendicolare rispetto al pavimento (verticale).
Per citare Pavel Tsatsouline, “Usando il vostri braccio e gamba sinistri come asse di rotazione, e mantenendo il braccio destro con il kettlebell dritto e verticale, portate il ginocchio destro verso il petto e ruotate alla vostra sinistra. Distendete la gamba destra e lasciatela a terra. Il piede dovrebbe trovarsi all’ampiezza spalle o più distante, le ginocchia distese, e le punte dei piedi “puntate”.
A questo punto nel movimento, avrete quattro cose su cui focalizzare l’attenzione:
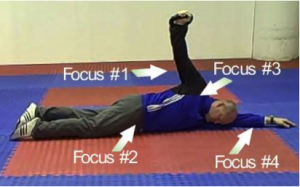
- Focus #1 – Il kettlebell e il braccio che lavora devono rimanere verticali (tenete il braccio con il kettlebell verticale su tutti i piani, senza guardare il kettlebell). Appoggiate la testa sul braccio sinistro.
- Focus #2 – Cominciate a muovere le anche ritmicamente, cercando di portare l’anca destra, in questo esempio, verso il pavimento. Questo aiuterà a contrarre il gluteo destro. Respirate, espirando in estensione. Il ritmo dovrebbe essere di una ripetizione ogni due secondi.
- Focus # 3 – Cercate di mantenere il collo e la zona toracica in allungamento.
- Focus #4 – Spostate il braccio sinistro (quello a terra) sempre più indietro. Pensate di allungare il dorsale.
Quando ne avete avuto abbastanza, tornate indietro molto lentamente, in pieno controllo.
Pullover con Kettlebell
Il Pullover con kettlebell è un altro esercizio trascurato e tuttavia molto efficace nel cambiamento della postura. Questo suggerimento dall’aria innocente avrà un enorme effetto sulla vostra capacità di raggiungere quella bella posizione di blocco del braccio sopra la testa, tipico di press, jerk, snatch, ecc. Così come avrà un profondo impatto sulla vostra postura.
Ecco come eseguirlo:
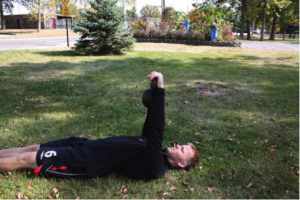
- Stendetevi a terra sulla schiena.
- Afferrate un kettlebell leggero con entrambe le mani; agganciate i pollici alla maniglia in modo che il corpo del kettlebell si appoggi all’interno dei vostri avambracci.
- Pressate il kettlebell sopra il petto – un po’ come per una spinta in panca.
- Attivate i dorsali e bloccate i gomiti. Questi devono rimanere bloccati e i dorsali attivi per tutto il movimento.
- Ora lentamente abbassate il kettlebell in basso e indietro, come per eseguire un arco, in modo che passi sopra alla vostra testa, fino a terra.
- Inspirate, contraete l’addome e invertite l’arco eseguendo il “pullover”, in modo da completare il movimento all’altezza del petto. Ripetete dalle 5 alle 10 volte.
Nota: Se non riuscite a raggiungere il pavimento, senza sbloccare le spalle, o senza flettere i gomiti, andate fino a dove vi è possibile ed eseguite dello stretching contrai/rilassa, permettendo al kettlebell di guadagnare terreno verso il basso a ogni fase di rilassamento. Siate conservativi. Potrete andare più profondi ad ogni set. Con il tempo sarete in grado di affrontare il pullover completo.
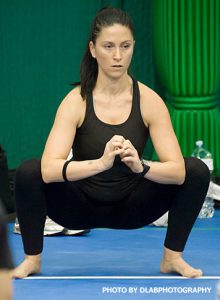
Il Tactical Frog
Il Tactical Frog è la bacchetta magica per ottenere un incredibile controllo delle vostre anche e per migliorare la vostra prestazione nello squat. Ha un incredibile efficacia su quasi tutti i movimenti atletici.
Video Tactical Frog
Pavel Macek FSIS Demos the Moves
Sveliamo il Four Knots Program – Programma dei quattro Nodi
Inizierò in modo molto semplice questo programma, perché preferisco avere qualcosa di semplice e che si possa rispettare al 100%, piuttosto che qualcosa di complicato che si riesca a seguire solo a metà. Ci sono quattro sessioni a settimana, per le prossime quattro settimane. Eseguitele in qualsiasi giorno vi vada bene, ma fatele. E non abbiate paura, per la fine della quarta settimana avrete preso slancio ed avrete completato il programma completo.
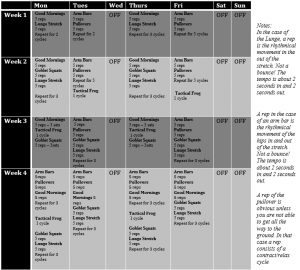
(note alla tabella)
Nel caso dell’Affondo/Lunge, un movimento ritmico dello stretch è considerato una ripetizione. Non è un molleggio! Il tempo di esecuzione è di circa 2 secondi in avanti e 2 secondi indietro.
Nel caso dell’Arm Bar, una ripetizione è il movimento ritmico del bacino in avanti e indietro. Non è un molleggio! Il tempo di esecuzione è di circa 2 secondi in avanti e 2 secondi indietro.
Una ripetizione del pullover è ovvia, a meno che non siate in grado di completare il movimento fino a terra. In tal caso, una ripetizione consiste in un ciclo di contrai/rilassa.