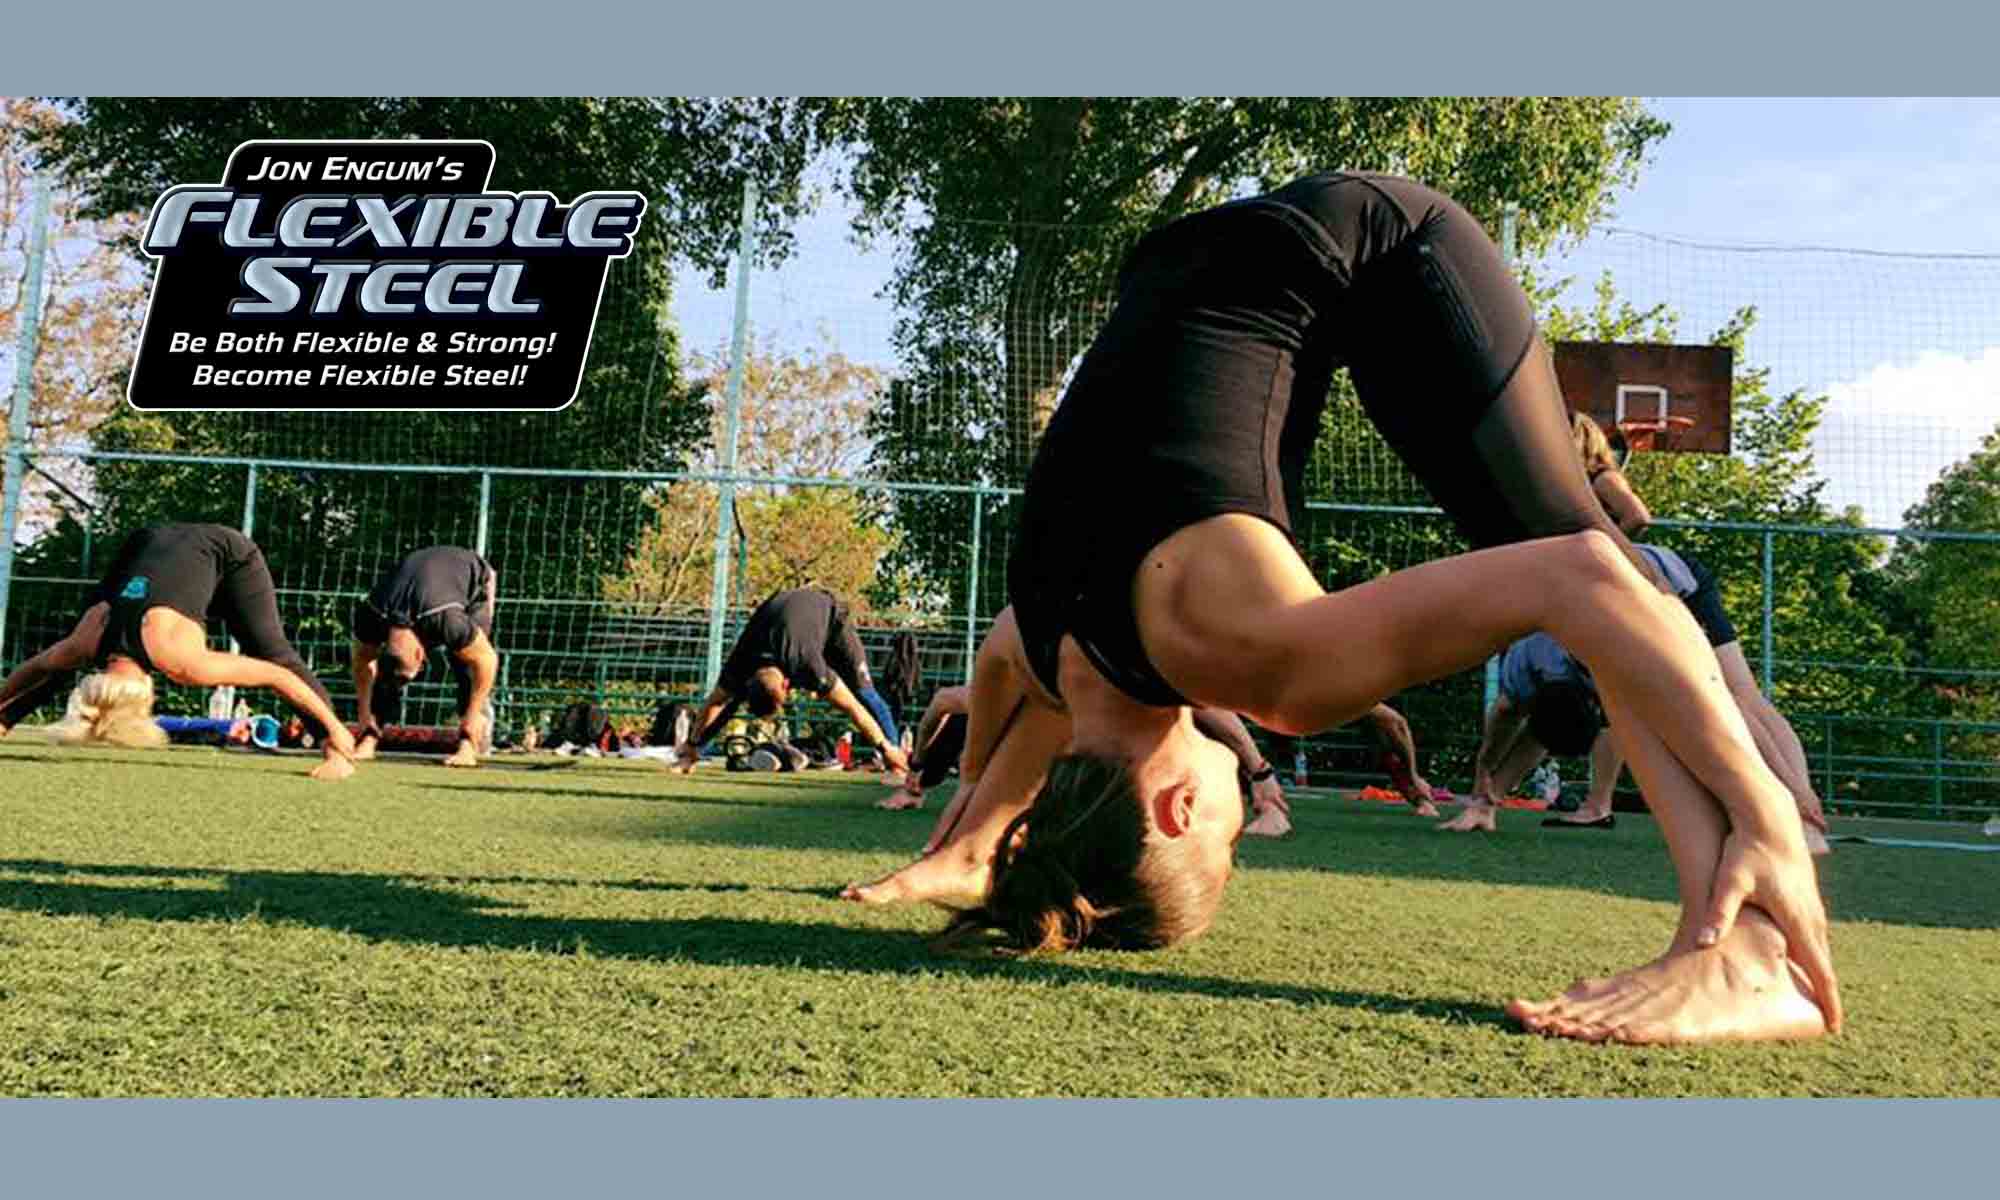
Flexible Steel Friends – I would like to introduce the 1st in a 3 part series on the Cossack Squat. This is more than a few quick tips, rather it is an intensive and impressive premier on this very beneficial move designed to make you both Strong and Flexible at the same time. The author is Piort Kowalik, Flexible Steel Instructor Specialist (FSIS) from Poland. Follow Piort’s advice and you too will become like Flexible Steel! Jon Engum
COSSACK SQUAT – strength, mobility and flexibility all in one – PART 1
You should be fit, you should be strong, you should also be flexible and you should not have any problems achieving full or even greater than full range of motion in every joint of your body. Can you? Great. But can you maintain full control? Can you maintain perfect harmony?
 Not everyone who is strong is also well coordinated and flexible. Just as not everyone who is flexible is well coordinated and strong. And definitely not everyone who is well coordinated will also be strong and flexible.
Each of these traits can work without the others, but their impact on one another cannot be overstated. Just look how strength increases with a fully controlled movement thanks to perfect coordination. Now see how a full range of motion will remove any obstacles from this well coordinated strength. This is the goal of one following the idea of Flexible Steel.
Let’s take a closer look at these traits. Flexibility without control and strength is simply unsafe, and coordination without strength and range of motion does not have space to maneuver.
You know you’re strong. Your movement is well coordinated and you can manage it however you want at a high level. Your flexibility is also a thing of envy. Now check if you can make use of all these things at once. This isn’t as easy as it may seem. There are people who are strong, but put them in an “awkward position” and they won’t be able to switch their strength on and use it. When performing complex movements, where each limb is doing a different thing or holds different position at the same time and where we are unable to control it by watching it, is another level for working on strength, flexibility and mobility. Work on this and be Flexible Steel.
Goals:
We want to aim high and reach far. When we undertake an activity we naturally want to get good at it. I mean, that’s what it’s all about. When beginning a new thing no one wants to be average at it and achieve nothing. And that’s great, however, there is one small problem at this stage – the fact is that many beginners (regardless of the discipline) as soon as they learn basic principles already aim for the highest peak. Many are not interested in the road that leads to it, and that road or path can be interesting – even though sometimes it may be uneventful it is still necessary to travel on it. On our road to the highest peak we often find many beautiful “viewpoints” which should also interest us.
One of the methods, which have helped me achieve my own difficult training goals, is the little step rule. Every distant dream can (and should) be made closer by setting a number of smaller goals that we will meet “on the way.” These goals can and often will have their own sets of smaller goals.
Here’s how I do it:
You take something you want to achieve, a very distant goal. You come up with 3 steps, which you have to achieve to get there. Arrange them from the easiest to the hardest. Then you come up with 3 steps necessary to achieve each of those steps and you arrange them like before.
For example let’s assume your goal is the split. Sure, you can just start doing splits, even if there’s two feet between you and the ground, but it’ll look a little bit different according to the method that I use. Because the split is not simply about flexibility but also hip mobility – my first step is an exercise, which mobilizes, lower half of the body – the squat. But I don’t want my split to be a position that I can’t get out off. I want to be able to almost jump to straight legs from it. I think I’d need a little bit of strength for that. What will strengthen my lower body and stomach?
The squat!
So I’ve chosen correctly – Step 1 is Squat training.
Since my last step is the split, what then will I need on the way? My choice for the Step 2 is the exercise by the name of Cossack Squat. Why? Because it is a squat with one leg straightened out to the side – getting us that much closer to the split. And since that is my ultimate goal and I already have the squat and the Cossack squat added to my road – two exercises where the first includes a lot of mobility and the other mobility and some flexibility, then the next logical step would be to add some flexibility. What exercises would add more of that? I’ll think about it when I’m dividing this step into 3 smaller ones. For now this plan will suffice.
Goal – The Split
Step 1 – Squat training
Step 2 – Cossack Squat training
Step 3 – Training for increased flexibility for the split
In this article I would like to write in more detail about the Cossack squat. If you’re at the level where your squat could still be improved or you’ve just started learning it, I suggest you find yourself a Flexible Steel Instructor, who will know what strategy to use in order to teach you this basic movement pattern (possibly anew), and then how to load it, in this correct pattern, using kettlebells or barbells. To set 3 (or possibly more) steps might too difficult for you that is why you should refer to a qualified instructor.
Learning the Cossack squat is similar and you should see this article as an encouragement, find a Flexible Steel instructor in your area and work together to build a strong foundation for splits. This foundation should be the Cossack Squat.
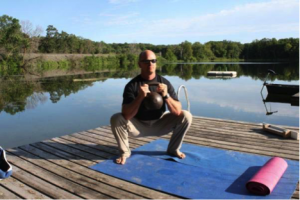
How to perform a correct Cossack Squat. 
The Cossack squat is but a deep squat with one leg to the side. Because this position is asymmetrical you should practice it on both sides. The torso should be vertical with a proud open chest and packed and retracted shoulders. The top of the head should reach as high as possible towards the ceiling constantly “growing.” The knee of the bent leg is in a position similar to a normal squat – opening to the side, toes and knee face the same direction (don’t let the knee cave in!). The other leg is straight, knee locked, and the ankle is in dorsiflexion so that the toes are pointed upwards. In this position, the weight should be distributed on both heels.
 My martial arts background lets me add one more position, which can serve as a step on the road to the split. It’s the Cossack Squat with two feet flat on the floor. Contrary to the toes up version the Martial Arts Cossack squat requires the whole foot to be flat with the outer edge of the foot pressing on the floor.
Cossack squat is not an easy position, although some will find it not to be too difficult. It demands stable and braced torso, full range of motion in the hips, knees and ankles, as well as enough flexibility in the adductor magnus muscles. During group Flexible Steel classes in my school, it is clear that people training martial arts on daily basis had little difficulty to get into this position. Most of them assumed correct position straight after hearing the instruction. The Martial Arts students had some difficulty with correct squats, but after a while it improved significantly. The students who just studied kettlebells had problems to get into the Cossack Squat and maintaining correct movement patterns. Our kicking fighters have no problems with leg flexibility, but the kettlebell students required more attention.
Despite of your sport background and whether the Cossack position is hard for you or not, always make sure you’re not making any of the following mistakes:
- The hip moves outside the heel on the bent leg side
- The heel of the bent leg does not touch the floor and you can’t press down on it.
- Torso is not vertical.
- The knee of the bent leg caves in.
- (MA Cossack) The outer edge of the foot of the straight leg is not touching the ground.
- The height of the position is wrong – hips are higher than the knee on the bent leg side.
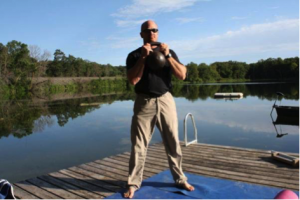
On the road to get a good Cossack squat you may find few challenges and based on them create new “steps” achieving which will not only help you find correct position, but will also allow you to build strength in this position, not to mention that it will get you shockingly close to achieving the split. Build strength based on training using your own bodyweight. This will allow you to load the position with a kettlebell and enter a new level of building total body strength by doing squats, switches and presses. But… first things first.
Troubleshooting the Cossack Squat.
1.The hip moves outside the heel on the bent leg side
This happens often when the range of our straddle is small. Poor flexibility of the adductors will limit our progress. Let’s deal with it first.
STRADDLE
The straddle includes many moves each of them works our muscles a bit differently stretching them for a wider straddle. Reach forward or to both your feet, remembering the Three S principle (you’ll learn more about it on Flexible Steel Instructor Certification Level 1 and 2 or by working with a certified FS instructor).
Remember whenever your legs seem to get used to a stretch try doing it a bit further and wider. The wider you go the easier it will become to reach forward and to the sides. Always try to maintain a neutral spine.
The video below presents a method to gradually reach forward, which I often use in my classes (P.S. For beginners it will be enough to just sit in the straddle position and try to relax.)
SIDE SPLIT
A logical consequence of a straddle taken far enough is its vertical variant where gravity aids us in the stretch. By the split we don’t necessarily mean its final version where we’re sitting flat on the ground. Especially since our main problem is poor adductor flexibility.
However this position of the body will bring us additional benefits. When we limit our range of motion by tensing the muscles to prevent sliding apart into the split, we learn how to control entering and exiting this range of motion. Use different versions of hand support, holding on to an object in front of you, hanging by something fixed above your head or by just holding the position while tightly flexing the muscles.
Always exercise common sense and never act thoughtlessly, because any potential injury can delay any progress for weeks or even months. Work smart and preferably with the assistance of a Flexible Steel instructor.
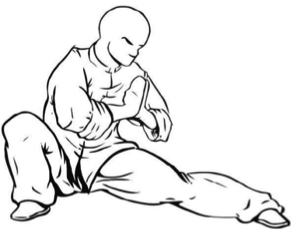
GROUND COSSACK or a Tactical Frog with your leg straight
Tactical Frog is a great exercise which can work wonders. You can learn about it’s potential during the Flexible Steel Certification. This exercise “attacks” our weak points and depending on what we need the frog gets the job done. It looks inconspicuous and at a first glance even funny, but spend a couple of minutes in this position and you’ll stop laughing, and after several more sets like that you’ll be shocked just how much the frog improved your squat, your straddle and your Cossack squat.
In the frog position just straighten out one leg to the side and all of a sudden you are in the Cossack squat position, but in a slightly different relation to the floor. By moving back and forth you enter the ROM that builds the flexibility of the entire back of our legs. When the toes are pointed to the front you will feel a deep stretch on the inside of your thighs, and when you point the toes up at the same time touching your buttocks to the floor and lifting the torso to a vertical position you will feel that pleasant sensation of your muscles being stretched on the bottom part of your thigh. Don’t be afraid to reach your torso towards the straight leg in this position, if you want.
PARTNER HIP BLOCK or blocking the hip from going to the side
This corrective exercise is perfect for people who have no clue what I mean when I say that the hip should not go to the side in the Cossack position. I’ve noticed in my students that many beginners compensate lack of flexibility in the adductors by this maneuver. Explaining wasn’t enough. Even though I did my best to come up with the most imaginative descriptions my adepts simply did not catch my vibe. Moreover, they were convinced that their position was correct. Only when I blocked their hip from going to the side (by simply blocking it with my leg) it hit them – the range of motion down ended at the knee, and the strong pull of non-flexible legs made it impossible to go deeper/wider.
This drill is useful when you need to re-teach the movement pattern. You can do it with another partner who holds your hand preventing you from falling back.
- The heel of the bent leg does not touch the floor and you can’t press down on it.
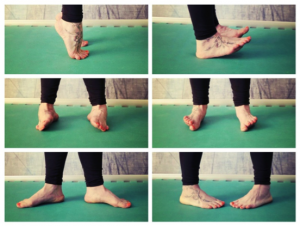
If your range of motion in the ankle is clearly limited it will significantly affect your squat and its different versions like the pistol or the Cossack squat. In this situation the body has two ways out: either fall over on the back or find some other way to maintain vertical torso. The two most common compensation are toe abduction to the outside with simultaneous loading of the inside of the foot leading to flattening of the medial arch of the foot. Such compensation is hazardous and leads to problems with your knee and hip. Another compensation is more popular with the Cossack squat – heel leaving the floor resulting in decreased dorsiflexion of the ankle.
If you don’t want to have any movement restrictions in your ankle just move it in many different ways as often as possible. Working your ankle doesn’t require a gym. You can make circles with your foot in your full ROM throughout the entire day. Myself, I often stand on a stair so that the heel drops below the step and just hold it. It might be worth checking whether we’re not being held back by our calves, plantar muscles or shin muscles, if we massage them the right way it will improve our movement.
We have many great mobility drills in stock for that. Not all of them are equally effective for all people, that is why you always have to check, test, practice and test again. For example, you can do the following exercises:
STRANGE WALKING – mobility drill for the ankle presented by Master SFG Fabio Zonin during a remarkable StrongFirst Bodyweight seminar.
This drill always gets few laughs, because it looks really strange and some might not take it seriously. However the results can bring a different smile together with surprise.
TEST YOUR COSSACK
THEN:
Walk the distance of 60-90 feet this way:
 A) on your toes; B) on your heels; C) on the outside edges of your feet; D) on the inside edges of your feet; E) with your toes completely abducted to the outside; F) with your toes completely adducted to the inside;
Retest.
While walking this way try to keep your knees locked, also try to forcefully press down on each of the feet positions while walking. And? Did it work?
ANKLE CIRCLES
It’s an exercise from FMS/GFM arsenal and is one of my personal favorites for ankle mobility. Just grab the top of your foot with your hand and hold the heel of the other foot so it doesn’t leave the floor. Push your knee forcefully towards the second toe. When you reach the end push further, but this time slightly to the outside towards the little toe and come back with a circular motion to the starting point. A dozen circles or so on both feet for couple sets and your ROM should be significantly increased.
Small hint: If I am holding my foot with my right arm from the top and pushing the heel down with left, my right hand is located on the inside of my right thigh. In this position I am not impeding my own movement and I am making sure that the knee does not cave in. Notice how your hips are positioned in relation to the entire foot. There’s no need to put them outside in a strange contortion.
NARROW SQUATS (SLOOOOOWLY)
This is an exercise that will not only test your ankle’s range of motion, but also load it and thus reinforce the new ROM. A very slow version will add the twist at the end of the punch and build strong core, hips, knees and ankles. You will find more details on this in Flexible Steel Instructor Mark Cheng’s articles and his training programs.
Remember to keep your ankles and knees together throughout the movement. Give yourself some time and do the exercise at a speed that will allow you to go to the very bottom after 30 seconds and take the same amount of time going up. Why do something fast, if you can’t do it slow?
HEEL UP – Cossack squat with elevated heel
Perhaps your ankle needs more time that is why you should be learning the 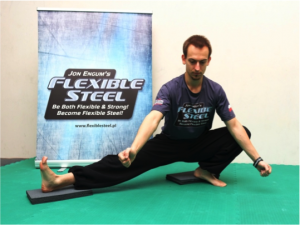 correct body position with perfectly straight and vertical back today. Put something under your heel, nothing big, just enough to make you stable so that you don’t feel like you’re going to fall back, at the same time low enough that you need to use force to pull your feet up.
Such work teaches you the position and allows the body and the nervous system to accept this set up as safe. And we know too well that when the nervous system is no longer getting the danger message, magic happens.
Using this method of correction we teach the student to maintain vertical torso, which is another item on our list – add this drill as another correction specifically for troubles to maintain vertical position in the Cossack squat.
To be continued: Check back next week for Part 2 of this 3 part series!
PIOTR KOWALIK
The founder and manager of the Sports Centre and School of Martial Arts “IRBIS” in Krakow. The coach and trainer of gold medallists in the Polish Wushu Championships.
The instructor of StrongFirst SFG1 and Flexible Steel Instructor Specialist, who can share his expertise with passion during training sessions in the Kettlebell Centre Krakow and during all the other trainings in Krakow and all around Poland.
Apart from teaching how to build strength and flexibility based on such tools as kettlebells, he teaches Chinese Martial Arts – Kung Fu that he has been practising since a child.
He started the training of Chinese martial arts in 1991. For years he has been one of the most title-winning Kung Fu (Wushu) competitors in Poland. He teaches both traditional and sports varieties. He holds the title of the World Champion won at the World Championships in 2004 in Chile and in 2006 in China.
He was awarded with the Prize of the Minister of Sports and Tourism of the Republic of Poland for winning gold and silver medals at the World Traditional Wushu Competitions in China in 2010. He was awarded with a prestigious title of the “Best Competitor of 2006” by the American Federation of Chinese Kuoshu in Baltimore, USA.