The front splits are important to the longevity of your movement. Besides the cool factor, the front splits are an important addition to your current ease of movement program.
The front splits focus directly on the hamstrings and the hip flexors at the same time making it a big bang for your buck movement. Just ask almost any doctor and they will tell you one contributing factor in lower back, noncontact injuries, is tight or weak hamstrings and hip flexors.
Focused training on the front splits and the supplemental exercises will go a long way to help “bulletproof“ your back.
Follow this program patiently to the letter and I’m sure you will be very happy with results.
Flexibility Training Takes Patience
When you participate in one of our Flexible Steel certifications we give you some amazing instant gains, but for long term sustainable results training must be in the moderate intensity range and consistent. A moderate program with 100% compliance will yield far better results than an advanced intensive program that is not followed precisely.
That said, we will break this program into 2 – 6 week phases, a preparatory phase and a focused front split phase.
Phase I: Preparatory Phase
During the initial phase we will hit the major players with a moderate training program designed to prepare you for more intense focused front split work to follow in phase II.
The Power Tools
Flexible Steel offers many different Power tools to soup up the results of your standard stretching movements. During this program we are going to take advantage of a combination of just two different power tools: Mini contractions and relaxed stretching, a.k.a., waiting out the tension.
A mini contraction is exactly what it sounds like. Put your muscles into a stretch position to the point where you just start to feel a stretch. Then, lightly contract the stretching muscles just enough to move yourself slightly out of position. Relax and repeat the cycle for 10 repetitions. This is not a heavy duty isometric contraction, rather just a twitching of the targeted muscle groups. Each mini contraction will consist of a rhythmical cycle held for about one second and then relax for 1 second. Muscle power on, muscle power off.
After 10 mini contractions, relax and move a little deeper into the stretched position. Hold the static relaxed position for 15 seconds. Don’t guess, you need to actually count to 15.
A combination of 10 mini contractions and a 15 second relaxed hold constitutes one rep. You will repeat this for three reps and this will constitute one set. Remember this ratio: (10 mini contractions and a 15 second relaxed hold.) X3.
The Moves
Phase 1 will include exercises to target the following:
Calves
Hamstrings
Quadriceps
Hip flexors
1. Calf Stretch
The Calf Stretch is best performed with your shoes on so not to stress your foot too much.
Find a step, block, stair or similar object.
Stand with the ball of one foot on the edge of the stair and the rest of your foot hanging off in the air. Yes, that does rhyme.
Lower your heel until you feel stretch in your calf.
Now contract your calf muscles to raise yourself up a couple inches. This is one mini contraction.
Repeat for 10 times.
Let your heels sink deeper into the stretch and hold that position for the count of 15. Repeat the combination of mini contractions and relax stretching for two more cycles.
Switch feet into the other side.
2. Hamstring Stretch
Place the heel of your foot on a table, bar, or post that is slightly higher than your waist level.
Either pad your heel or wear shoes so you’re not distracted by pain in the back of your heel.
The toes and knee of your airborne legs should be pointed directly to the sky.
Keep your knee straight.
The knee of the standing leg should also be straight. Your knee and toes should track.
Keeping a big chest, place your fingers in the crest of your hip. Using your fingers as a guide fold forward at the hip.
It is important to note the only movement is coming from your hip. Do not round your back.
Once you feel stretching in the hamstrings, begin to perform your mini contractions buy driving your heel into the table causing you to rise slightly out of the stretched position.
Relaxing move deeper into the stretch. This is one mini contraction.
Repeat 10 more times.
After the 10th contraction move deeper into stretch position and statically hold for 15 seconds.
Repeat for three rounds.
3. Quadriceps Stretch
Bend your knee so your foot goes behind you and your instep is placed on the bench, bar or other similar support about waist high.
Keep your knees close together.
Squeezed the glute on the airborne side.
Tighten up your quads to slightly pull yourself out of the stretch and then relax and move further into stretch. This is one mini contraction.
Repeat 10 more times.
After the 10th contraction move deeper into stretch position and statically hold for 15 seconds.
Repeat for three rounds.
4. Hip flexor Stretch
Get into a half kneeling position.
The knee of your right leg and instep of your right foot are facing down, in a straight line and on their own railroad track.
Your left foot is on the left railroad track.
Your hips should be squared off and level.
Do a hip tilt. Imagine your beltline is the rim of a coffee cup, tilt your hips in such a way that the coffee would pour out the back of your “cup.”
Take both hands and put them on your hips and move your hips forward to increase the feel of the stretch.
If the knee of your front leg starts to travel past your foot, simply slide your front foot forward a bit to adjust this.
Once you feel stretching in the hip flexors , begin to perform your mini contractions buy driving your down knee forward into the ground which will cause you to move out of the stretch a bit then relax and move deeper into the move.
This is one mini contraction.
Repeat 10 more times.
After the 10th contraction move deeper into stretch position and statically hold for 15 seconds.
Repeat for three rounds.
The Program
These exercises will be performed as a short circuit. Some days you only have to do one circuit while other days you will perform the circuit two to three times. Do one round of each exercise and this will constitutes one circuit.
The six week program will shake out like this. You will train four days a week. You may insert this stretching program after your regular strength training/sport practice or, as a standalone program. If you use it as a standalone program, make sure to do your mobility drills prior to doing the intense stretching.
Further Explanation
1. Number of days should be self explanatory.
2. Intensity stands for how hard your mini contractions are.
3. L equals light contraction. In other words just barely contract your muscles.
4. M equals medium contraction. So contract the muscles harder than you would during late days but not as hard as you possibly can.
5. H equals hard contraction. Contract stretching muscles is hard as possible.
6. Circuit means how many rounds you will do of the program.
¿Qué crees que haría un mejor rango de movimiento en tu desempeño deportivo? Imagina no tener que pelear con tu propio cuerpo. Imagina tener movimientos fluidos y sin obstáculos a tu entera disposición.
¿Qué tan buena sería tu vida si pudieras recuperar toda la brillante movilidad de tu juventud? Quiero que comprendas que no estoy hablando del tipo de flexibilidad débil que tiene un sujeto a expensas de su fuerza y potencia, no señor, estoy hablando de un tipo de flexibilidad fuerte y potente que te ayudará a mejorar tu vida y tu desempeño deportivo. ¿Interesado?
Sigue este simple programa de 4 semanas y te garantizo que obtendrás resultados sorprendentes y además, estarás en el camino indicado para convertirte en “Flexible Steel”. Dame 4 semanas (son 16 sesiones en total) y le daré un buen respiro a tu desgastado cuerpo.
PRIMERO: UN CAMBIO EN EL PARADIGMA
El difunto Jack Lalane podría ser fácilmente considerado como el padrino del fitness como lo conocemos. Jack estaba muy adelantado a su tiempo, el no entrenaba clientes, el ENSEÑABA ESTUDIANTES. El no hacia ejercicio, el PRACTICABA, sus sesiones de entrenamiento eran llamadas LECCIONES no ejercicio. Podemos aprender bastante por el simple cambio en sus expresiones, que de hecho, no son para nada aleatorias al contrario, fueron seleccionadas cuidadosamente para enfatizar un punto muy importante. No hay que perseguir repeticiones y series sin ningún sentido, tampoco levantar peso por levantar sin un objetivo, en vez de eso ve con una mentalidad de ser mejor en lo que haces ya sea en el gimnasio, en la pista, en el campo, la idea siempre es ser mejor. Intenta aprender una lección, intenta mejorar tu forma en la técnica, intenta aprender algo nuevo. Lo que sucede cuando cambiamos nuestra manera de pensar es simple: Obtenemos nuevos PR. Si tenemos nuestra mente y cuerpo unidos, mantenemos las lesiones alejadas. Cuesta repetir: Ve a una práctica o a una lección, no a hacer ejercicio pero es la forma correcta. Aprender mantiene a uno joven.
LA LECCIÓN: LOS CUATRO NUDOS.
Mi amigo y colega el Dr. Mark Cheng llama a las caderas y los hombros, “los cuatro nudos”. Lo anterior es muy conocido dentro de la medicina oriental, sin embargo, aquí en occidente no lo es tanto. Los 4 nudos tienen muchos significados importantes, permíteme explicarte: Los hombros y las caderas unen los brazos y las piernas a tu cuerpo, esto es obvio, pero, vamos a tomar la analogía del nudo más allá: Si tu tenis o tu zapato tiene unos nudos flojos, ¿Qué sucede? Se salen, hay que comprender que un nudo no puede estar muy flojo. ¿Y qué pasa, si está muy apretado? No lo puedes deshacer y por ende no puedes remover tu zapato. Bajo esta misma analogía debemos comprender que para tener un nudo funcional, debemos tener el balance perfecto entre fuerza y flexibilidad. Tu cuerpo debe ser: Acero Flexible (Flexible Steel), el acero flexible se dobla, pero no se rompe.
CADERAS Y HOMBROS
Durante las próximas 4 semanas nuestra lección será: Ganar más flexibilidad y movilidad en las caderas, espina torácica y hombros. ¿Porque? Por qué obtendremos una pequeña explosión en nuestro desempeño si logramos tener incluso la menor de las mejoras en esas áreas. Se ha dicho que “Un atleta debe mover las caderas primero” Gray Cook, el fundador de Functional Movement System (FMS) llama a las caderas “Un mal vecino”, significa que si no tienes caderas fuertes y con buena movilidad, tus rodillas y espalda baja deben compensar. ¿Alguien con dolor de rodillas o de espalda baja?
El plan de 4 semanas que te voy a compartir está diseñado para ser realizado por la mañana antes de tu entrenamiento habitual. Puedes realizar cualquier otro ejercicio o actividad que este en tu agenda, y por favor no lo consideres un “calentamiento” o un “entrenamiento” mejor piensa en el como una lección o práctica de movimiento.
Los Movimientos
A continuación te muestro los ejercicios seleccionados de mi libro “Flexible Steel” aprenderás la técnica de ejecución de estos movimientos.
Sentadilla Goblet con Kettlebell
Dan John, extraordinario coach y autor de fuerza desarrolló la sentadilla goblet con kettlebell. Hemos encontrado que con uno o dos meses de practicar esta singular forma de hacer sentadilla tiene un efecto dramático en abrir las caderas y la espina torácica. Mejorará tu desempeño para hacer cualquier tipo de sentadillas – No importa si son front squats, back squats o cualquier variación que sea de tu preferencia.
Toma un Kettlebell por la oreja, con las manos lo más próximas al cuerpo, como si estuvieras tomando el volante de un auto. Pavel llama este agarre “por los cuernos”. Realiza la sentadilla enviando tus caderas hacia atrás y abajo entre tus talones.
Lo siguiente se explica solo, pero aun así te lo voy a decir.
Asegúrate de que tus rodillas estén alineadas con las puntas de tus pies y se mantengan en la misma dirección de éstas durante todo el movimiento de principio a fin.
Mantén tus talones en el piso y las espinillas en vertical.
Mantén tu espalda recta, no permitas que tu coxis se desplace durante el movimiento en el fondo de la sentadilla.
Mantén el pecho abierto “orgulloso”, especialmente en la posición del fondo.
En la posición del fondo, coloca tus codos rectos alineados con el piso por dentro de las rodillas sin perder la alineación de la espalda.
Utiliza tus codos para abrir tus rodillas y caderas.
Tus pies se deben mantener bien en contacto con el piso.
Asegúrate que tus caderas, rodillas y caderas asciendan al mismo tiempo.
No inicies el movimiento con la cadera.
Utiliza la sentadilla Goblet como un ejercicio de movilidad así como de estabilidad, quédate unos segundos en la posición del fondo, muévete lado a lado y realiza pequeñas figuras en 8, esto ayudará a abrir tus caderas. Intenta alargar la espina y hacer espacio dentro de tu cuerpo.
El estiramiento “buenos días” con Kettlebell.
Uno de los estiramientos más sencillos y efectivos que conozco para los isquiotibiales es el “Buenos días” y sus variantes, aquí te muestro una variante bastante efectiva del clásico “Buenos días”.
Indicaciones: Párate derecho, con los pies a lo ancho de tus hombros.
Sujeta un Kettlebell detrás de ti, aproximadamente a la altura de tu coxis.
Abre el pecho “muy orgulloso” y permítete estar con las rodillas “suaves” no bloqueadas.
Muévete con tus caderas, piensa en empujar el Kettlebell hacia atrás con tu cadera mientras mantienes la espalda recta y el pecho abierto.
No te preocupes por que tanto puedes inclinarte hacia al frente, esto no es un toque de punta de pies, mejor concéntrate por que tanto puedes enviar el Kettlebell hacia atrás con tus caderas, esto es una bisagra.
Si realizas este movimiento como se te indica vas a sentir un estiramiento muy intenso en los isquiotibiales, justo por debajo de tus glúteos.
El estiramiento desplante.
Como hacer el desplante:
Colócate en posición de desplante apoyándote en tu rodilla derecha, el empeine de tu pie derecho también debe estar tocando el suelo.
Asegúrate de alinear tu rodilla y tu pie en la misma línea, tu pie frontal debe de seguir su propia línea vertical y tu rodilla izquierda debe estar en el aire.
Asegúrate de que tu espinilla izquierda, en este caso, este vertical y que tu rodilla esté por arriba de tu pie.
No permitas que tu rodilla izquierda se desplace más allá de la punta de tus pies.
Manten tus caderas alineadas, imagínate que tienes luces en las crestas de tus caderas, entonces asegúrate que ambas luces alumbran hacia enfrente.
Ahora, coloca tus manos por detrás de tu espalda baja y empuja tus caderas hacia enfrente. Deberás sentir un estiramiento en el muslo y la cadera, aproximadamente a la altura de donde quedan las bolsas del pantalón.
Empuja hacia al frente y atrás utilizando un ritmo en el movimiento, 1 segundo al frente y 1 segundo atrás.
Quick Tips:
Contrae el glúteo del lado que está estirando para: a) Proteger tu zona lumbar. B) relajar el flexor de cadera a través de la inhibición recíproca.
Si es que tu rodilla llega a rebasar la línea de tus pies, simplemente re posiciona más adelante para un desplante mas profundo.
Exhala cuando estés realizando el estiramiento, esto ayudará a relajar los músculos.
Inclina tus caderas hacia enfrente y arriba antes de que empieces el estiramiento, esto para que los músculos entren a un estado cómodo de pre-estiramiento. Esto mejorará tu esfuerzo.
El Arm Bar
El efecto del arm bar en los hombros, espina torácica y toda la postura es evidente tan pronto realizas el movimiento. Puedes sentir inmediatamente una dramática mejora en la postura de todo tu cuerpo. Examinemos la técnica adecuada del clásico arm bar. El arm bar inicia de la misma forma que su primo más cercano: “El Turkish Get Up”. Escribo esto asumiendo que ya sabes cómo realizar un Get Up. Si no sabes cómo hacer un Get Up, deja de leer y ve a buscar un instructor ahora mismo que te enseñe el Get Up.
Recuéstate en el piso con un Kettlebell liviano de tu lado derecho.
Sujeta el Kettlebell con agarre de pistola: Mano derecha por dentro de la oreja y la mano izquierda sujetando por afuera, junta tu codo a tus costillas
Vas a rodar hacia tus espaldas y al mismo tiempo vas ir levantando el Kettlebell. Una vez sobre tus espaldas, usando ambos brazos vas a colocar el Kettlebell justo en la posición de “disparo”, tal y como lo haces para el Get Up.
Las cosas empiezan a ser diferentes al Get Up a partir de ahora.
Tu brazo izquierdo va recostado por arriba de tu cabeza (horizontalmente en relación al piso), mientras que el brazo que sujeta el Kettlebell va perpendicular al piso (verticalmente en relación al piso).
Para citar a Pavel Tstatsouline, “Usando tu brazo y pierna izquierda como eje de rotación y dejando el brazo derecho con el Kettlebell recto y vertical, trae a tu rodilla derecha hacia el pecho y rueda hacia tu lado izquierdo. Estira bien tu pierna derecha y recuéstate en el suelo. Tu pierna debe estar alineada al ancho de tus hombros, tu rodilla estirada y tu pie haciendo punta.
En este punto del movimiento, debes concentrarte en 4 aspectos importantes:
Enfoque #1: El Kettlebell y el brazo que trabaja se debe de mantener vertical (Mantén el brazo vertical en todos los planos sin que voltees a ver el Kettlebell). Descansa tu cabeza en tu brazo izquierdo.
Enfoque #2: Rítmicamente comienza a empujar tus caderas hacia el piso, en este ejemplo piensa en llevar la cadera derecha al piso. Te ayudará a contraer el glúteo derecho, inhalar y exhalar suspirando hacia la extensión. La sincronización de la respiración y el movimiento debe ser: una repetición cada 2 segundos.
Enfoque #3: Piensa en hacer tu clavícula y tu área pectoral más larga y amplia.
Enfoque #4: Lleva tu brazo izquierdo (el que está en contacto con el piso) cada vez más lejos de ti. Piensa en que estas arrastrándote para salir de una trinchera
Cuando ya lo hayas realizado lo suficiente, leeeeentamente revierte el proceso de manera controlada.
El Pullover con Kettlebell
El Pullover con Kettlebell es un ejercicio que a menudo se pasa por alto, sin embargo, ayuda increíblemente a mejorar la postura. Este sencillo drill, tendrá un efecto dramático en tu habilidad de conseguir ese elegante bloqueo por arriba de tu cabeza a la hora de realizar presses, jerks, snatches, etc. Esto sin dejar de lado el impacto positivo sobre tu postura en general. Así es como lo vas a realizar:
Recuéstate sobre tus espaldas.
Sujeta un Kettlebell liviano con ambas manos; forma un gancho con tus pulgares y tu palma y vas a colocar la oreja ahí, de manera que el cuerpo del Kettlebell se recargue en la cara interna de los antebrazos.
Empuja el Kettlebell frente a tu pecho – Como si fuera un bench press.
Activa tus dorsales y bloquea tus codos. Debes de mantener la activación de los dorsales y el bloqueo de los codos durante todo el movimiento.
Lentamente inicia el descenso del Kettlebell hacia atrás, de forma que quede por arriba del nivel de tu cabeza y sobre el piso.
Toma aire, contrae y revierte el movimiento hasta que el Kettlebell esté alineado con el pecho, repetir entre 5 y 10 veces.
Nota: Si no puedes ejecutar todo el movimiento hasta el piso sin que pierdas la activación de los hombros o sin flexionar los codos, entonces llega solo hasta donde puedas mantener la postura correcta. Lo que vas a hacer es realizar movimientos de contracción y relajación, dejando que el peso del Kettlebell te lleve poco a poco hacia abajo con cada exhalación. Se continuo, ya que puedes llegar cada vez más abajo en cada set y con tiempo podrás dominar el pullover adecuadamente.
La Tactical Frog
La tactical frog es una bala mágica para ganar un control increíble sobre tus caderas y mejorar significativamente tu desempeño al momento de ejecutar sentadillas. Tiene un gran impacto positivo en casi cualquier movimiento atlético.
Video Tactical Frog
Pavel Macek Flexible Steel Instructor Specialist Demos the Moves
El programa para desatar los cuatro nudos.
Voy a empezar este programa de manera muy sencilla porque prefiero tener algo simple pero con un porcentaje de cumplimiento del 100% que algo complejo y con 50% de adherencia.
4 sesiones por semana, por las siguientes 4 semanas, realízalas en los días que mejor se te acomoden, pero ¡realízalas! Y no tengas dudas, al final de las cuatro semanas ganarás un impulso extra y podrás hacer el programa completo.
我的朋友兼同事Dr. Mark Cheng把肩膀和髖部稱為身體的四個關節。儘管這在東方醫學中應該是常識,但在西方卻不那麼普遍。四個關節有幾種不同的含義,讓我解釋一下:肩膀和髖部的肌群,幫助手臂和腿與軀幹穩固結合,這是很明顯的。但是,進一步說明”關節”理論,為了正常運行,關節不能太鬆弛。舉例而言:鞋帶鬆開,鞋子會鬆脫,如果鞋帶綁太緊,就難以解開,鞋子也脫不下來。因此,為了有效運用”關節”,您必須具備力量與靈活性間的完美平衡。您要像鋼硬靈活般,能屈能伸,卻又不會折斷。
髖部和肩膀
接下來四週的課程,我們將在髖部、脊椎和肩膀獲得更佳的靈活性與活動度。
為什麼? 我們只需要在這些關鍵部分作些許改善,就能讓我們獲得非常大的助益。“運動員必須優先啟動髖關節”,這是運動界廣為認知的觀點,Functional Movement Systems (FMS)創始人Gray Cook把臀部稱為 ”惡鄰居”。意思是說:如果您的髖部沒有強大的活動度,膝蓋或下背必會產生代償。
We at Flexible Steel would like to rekindle your mobility and flexibility and at the same time give you a chance to WIN $500. This is the time to set your goal to move better, with more energy and ease of movement. Take back control of your mobility AND get a chance to win $500! This 4-week program is one you can do with very limited equipment and space. It will not interfere with any other program you are currently doing; actually, I am sure it will improve it. You will also feel recharged and I believe it will help to de – stress. We did this challenge back in 2017 and everyone had great results. We are happy to offer it again.
Post a video of yourself either on Facebook or Instagram doing part of the training on the Flexible Steel International Facebook timeline.
Make sure to link us (Flexible Steel International) To link the page you need to use @Flexible Steel International and choose the right page in the post. You can post a new video daily for more chances to win. The more you post the better your chances of winning!
Be sure to share and nominate a different friend daily to join you in this exciting challenge.
Every time you post a video of yourself doing a part of the training and tagging @flexiblesteelinternational you are entered into a drawing for $500 cash.
The 8-week challenge starts April 1st, 2020. Weekly prizes will be given away with the grand prize of $500 to be randomly drawn on May 15st, 2020.
No BS just FS (Flexible Steel) and a new flexy you with our FREE 4 Weeks to Flex-Appeal Challenge.
We challenge you to become Flexible Steel!
CONTEST RULES
NO PURCHASE OR PAYMENT OF ANY KIND IS NECESSARY TO ENTER OR WIN. The “4 weeks to Flexible Steel Challenge Contest” is sponsored FlexibleSteel.com (“Sponsor”). This contest is governed by these official rules (“Official Rules”). By participating in the contest, each entrant agrees to abide by these Official Rules, including all eligibility requirements, and understands that the results of the contest, as determined by Sponsor and its agents, are final in all respects. The contest is subject to all federal, state and local laws and regulations and is void where prohibited by law. This promotion is in no way sponsored, endorsed or administered by, or associated with, Facebook. Any questions, comments or complaints regarding the promotion will be directed to Sponsor, not Facebook.
ELIGIBILITY The Contest is open to legal residents of their respective countries where not prohibited by law, who are eighteen (18) years of age or older at the time of entry who have Internet access and a valid e-mail account prior to the beginning of the Contest Period. Sponsor has the right to verify the eligibility of each entrant.
SWEEPSTAKES PERIOD The Sweepstakes begins at April 1, 2020 12:01 AM CST and ends at May 15, 2020, 12:01 AM CST. (“Sweepstakes Period”). All entries (submissions) must be received on or before the time stated during that submission period. Sponsor reserves the right to extend or shorten the contest at their sole discretion.
HOW TO ENTER Post a short video of yourself doing part of the challenge on the FlexibleSteel Facebook Page Timeline. Make sure to include the hashtag “FlexibleSteel” in the post. You can post a new video for another chance to win. The more you post the more you improve your odds.
WINNER SELECTION All eligible entries received during the Submission Period will gathered into a database at the end of the Submission Period. A winner will be chosen at random.
Weekly winners will be announced weekly. The grand prize winner will be announced on or about May 15, 2020 on or about noon CST. Announcement and instructions for prize will be sent to the e-mail address supplied on the potential prize winner’s entry form. Each entrant is responsible for monitoring his/her e-mail account for prize notification and receipt or other communications related to this sweepstakes. If a potential prize winner cannot be reached by Administrator (or Sponsor) within fifteen (15) days, using the contact information provided at the time of entry, or if the prize is returned as undeliverable, that potential prize winner shall forfeit the prize. Upon the request of the Sponsor, the potential winner may be required to return an Affidavit of Eligibility, Release and Prize Acceptance Form and IRS W-9 form. If a potential winner fails to comply with these official rules, that potential winner will be disqualified. Prizes may not be awarded if an insufficient number of eligible entries are received.
PRIZES: Grand Prize: $500 USD . Weekly prize: Flexible Steel book. Maximum value is $30. Terms and conditions may apply. Incidental expenses and all other costs and expenses which are not specifically listed as part of a prize in these Official Rules and which may be associated with the award, acceptance, receipt and use of all or any portion of the awarded prize are solely the responsibility of the respective prize winner. ALL FEDERAL, STATE AND LOCAL TAXES ASSOCIATED WITH THE RECEIPT OR USE OF ANY PRIZE IS SOLELY THE RESPONSIBILITY OF THE WINNER.
ADDITIONAL LIMITATIONS Prize is non-transferable. No substitution or cash equivalent of prizes is permitted. Sponsor and its respective parent, affiliate and subsidiary companies, agents, and representatives are not responsible for any typographical or other errors in the offer or administration of the Sweepstakes, including, but not limited to, errors in any printing or posting or these Official Rules, the selection and announcement of any winner, or the distribution of any prize. Any attempt to damage the content or operation of this Sweepstakes is unlawful and subject to possible legal action by Sponsor. Sponsor reserves the right to terminate, suspend or amend the Sweepstakes, without notice, and for any reason, including, without limitation, if Sponsor determines that the Sweepstakes cannot be conducted as planned or should a virus, bug, tampering or unauthorized intervention, technical failure or other cause beyond Sponsor’s control corrupt the administration, security, fairness, integrity or proper play of the Sweepstakes. In the event any tampering or unauthorized intervention may have occurred, Sponsor reserves the right to void suspect entries at issue. Sponsor and its respective parent, affiliate and subsidiary companies, agents, and representatives, and any telephone network or service providers, are not responsible for incorrect or inaccurate transcription of entry information, or for any human error, technical malfunction, lost or delayed data transmission, omission, interruption, deletion, line failure or malfunction of any telephone network, computer equipment or software, the inability to access any website or online service or any other error, human or otherwise.
INDEMNIFICATION AND LIMITATION OF LIABILITY BY ENTERING THE SWEEPSTAKES, EACH ENTRANT AGREES TO INDEMNIFY, RELEASE AND HOLD HARMLESS SPONSOR AND ITS PARENT, AFFILIATE AND SUBSIDIARY COMPANIES, THE FACEBOOK PLATFORM, ADMINISTRATOR, ADVERTISING AND PROMOTIONAL AGENCIES, AND ALL THEIR RESPECTIVE OFFICERS, DIRECTORS, EMPLOYEES, REPRESENTATIVES AND AGENTS FROM ANY LIABILITY, DAMAGES, LOSSES OR INJURY RESULTING IN WHOLE OR IN PART, DIRECTLY OR INDIRECTLY, FROM THAT ENTRANT’S PARTICIPATION IN THE SWEEPSTAKES AND THE ACCEPTANCE, USE OR MISUSE OF ANY PRIZE THAT MAY BE WON. SPONSOR AND ITS PARENT, AFFILIATE AND SUBSIDIARY COMPANIES DO NOT MAKE ANY WARRANTIES, EXPRESS OR IMPLIED, AS TO THE CONDITION, FITNESS OR MERCHANTABILITY OF THE PRIZE. SPONSOR AND ITS PARENTS, SUBSIDIARIES, AFFILIATES, ADVERTISING AND PROMOTIONAL AGENCIES, AND ALL THEIR RESPECTIVE OFFICERS, DIRECTORS, EMPLOYEES, REPRESENTATIVES AND AGENTS DISCLAIM ANY LIABILITY FOR DAMAGE TO ANY COMPUTER SYSTEM RESULTING FROM ACCESS TO OR THE DOWNLOAD OF INFORMATION OR MATERIALS CONNECTED WITH THE SWEEPSTAKES.
PUBLICITY By participating, each entrant grants Sponsor permission to use his/her name, likeness or comments for publicity purposes without payment of additional consideration, except where prohibited by law.
SWEEPSTAKES SPONSORS This sweepstakes is sponsored by: FlexibleSteel.com 712 Washington St. Brainerd, MN 56401 Any questions regarding this Sweepstakes should be directed to Flexible Steel Challenge Contest at info@extremetraining.net.
Pavel Macek, Flexible Steel Instructor Specialist, Master StrongFirst Instructor
Secret exercise of Tibetan monks for health and longevity – Snow Leopard! ‘Leopard’ is a special stretching sequence, practiced by Tibetan monks after long seated meditation practice and/or demanding climbing and hiking in the Himalayas, that allowed them to keep their body flexible and supple until very old age. Like actually…so, listen up!
Did you notice that people simply love “exercise with a story”? Eugene Sandow’s body tempering, Hackenschmidt’s squat, Tommy Kono’s deadlift, Chinese breathing exercises, and even Hindu pushups. The story of Leopard is a bit different, but just a little bit.
I have two cats, Mimoush and Adus. We love and care for them as members of our family, of course. Our love is repaid by their generous teaching because we can learn so much from our cats, such as that there is not much that you actually need to have a happy life. Basically just food, shelter, and love.
Cats value their space and private time and not only sleep (an activity that takes up a significant amount of their days). ‘Rest’ does not apply to the early morning hours (like 3:30 AM) though; that is the time when the exercise starts. Stomping on the heads of the sleeping innocent, sprints back and forth, depth jumps from the wardrobe, throws and drops (phone, laptop, cups… ), dodging thrown objects, “catch me if you can” and so on.
Cats like to meditate, too! They sit on the window and watch the street, but very often they just sit and… well, just sit. After every sitting meditation or sleep, they stretch – forward, backward, one leg, other leg, done.
And here comes the Leopard: You have certainly heard the stories of Asian martial arts, how a future Grandmaster watched a fight between a turtle and a sloth, and then developed a new style, right? Well, ‘Mimoush Stretch’ is certainly intriguing name, but many of you unfortunately haven’t had the pleasure of meeting her and Adus is a bit fat, more like bear, than a cat. So, “Leopard” it is. Although not a ‘Snow’ one, and not from Tibet. Sorry. Got’ya!
Secondly; it is a bit more complex that just the few seconds cat’s stretch. As you already figured out, I didn’t learn it from Tibetan monks, or even by observing my cats – it is (another!) variation of the so called “World’s Greatest Stretch”, originally developed by Mark Verstegen. Yes, there are many, many different variations, but this one is my favorite minimalist stretching sequence.
It combines a few different drills from Pavel Tsatsouline, Flexible Steel’s founder Jon Engum, Brett Jones, and many others. One exercise flows into another and together they form a nice anti-chair sequence of various stretches.
Some info on the sequence: As Flexible Steel students know, “stretching” is a bit of a misnomer. You don’t want to “stretch” much, you want to relax and subsequently get stronger in your newly found, ROM. We have many power stretching tools in Flexible Steel that will allow you to do so – and yes, you can use some of them in the Leopard sequence.
How to perform “The Leopard” • Watch the video • Get into the position • Spend 10 breaths or so there. • Perform 1-3 sequences per session.
30 days Leopard Challenge • Practice Daily. • Do it every day, for 30 days without a break • If it works, continue. Photo credit: Twitter @rikunow
Written By: Flexible Steel Instructor, Steve Milles
CK started training with me 12 years ago, when she was 38 years old. At the time she had two children — 3 and 5 — and was a stay-at-home mom. With a family history of diabetic complications, her doctor had warned her that she was already at a pre-diabetic stage and needed to address her weight and blood pressure sooner rather than later. CK was referred to me by another student — a doctor who had treated her husband — and knew she was interested in starting a training program. He also knew that like himself, she had tried several training regimens and trainers in the past, and hadn’t kept with it. We put CK on a program that included Muay Thai and StrongFirst Kettlebell training… and she killed it! She discovered that training could be something to look forward to, as well as something good for her. As the early days became weeks, then months, then years of consistent training neither CK, her friends nor her doctor could believe the changes in her health and physical composition.
Fast forward ten years. CK had been back in the workforce for some time, working behind the scenes in the television industry. Her job required lots of time sitting at a computer, behind a desk, on the phone. Training continued to be a regular, consistent part of her schedule and she diligently maintained her practice and her health. Then the mysterious pain and decreased mobility started, first in the left and then the right shoulder. Nothing seemed to cause nor alleviate the issue, and CK consulted a number of medical professionals who explored a variety of possible culprits from overuse, sleeping habits, injury, workplace repetitive stress, etc. In the end the diagnosis was adhesive capsulitis: frozen shoulder. Doctors are unclear as to what causes this condition, although immobility from injury can sometimes be a contributing factor, and it is most likely to affect women over 40. They do know that the shoulder capsule of connective tissue encasing the bones, ligaments and tendons of the shoulder thickens and tightens around the joint, restricting movement and causing intense pain. The symptoms typically begin gradually, worsen over time then usually resolve within one to three years. In CK’s case, her pain had increased, and mobility decreased to the point where she couldn’t lift her arms even to parallel. It had become an endless source of frustration and depression and prevented her from training in the manner she has grown to enjoy. Her doctor, physical therapist and I were all communicating, but conventional treatment involves primarily controlling pain and preserving as much range of motion as possible. She would see her physical therapist for massage and dry needling and me for primarily lower body movements that didn’t cause her pain — but she was increasingly frustrated, discouraged and in agony.
Then I attended the Flexible Steel Level 1 and 2 Certifications with Jon Engum. I saw some amazing increases in mobility by students at the cert and decided that CK might benefit from the Flexible Steel treatment. I followed the template for releasing the shoulder to the letter and the results were extraordinary; not just in terms of mobility gains, but also in the pain relief that she experienced. The process was straightforward and the results immediate:
1) Mobility Warm-Up
In CK’s case, this was more of an exercise in frustration than anything as she could not perform most of the movements. But I kept it light, joking a bit (we’ve been training together for over a decade, after all!) We stayed with the basics: neck extension and flexion, neck tilts, neck rotations, elbow circles, shoulder rotations, Egyptians, tea cups…all with such a severely limited range they were barely recognizable. Then some lower body to complete the warm up. More importantly, I was already getting good information on how limited her movement was and how quickly she felt pain.
2) Baseline
Before proceeding with the program, itself, we took a simple baseline in order to track any helpful or unhelpful movements. The test is simple enough: I asked CK to hook her thumbs together in front of her body, keep her elbows straight and locked and lift her arms up overhead. The picture shows the limit of her movement is chest height. Then the fun started.
3) Ankle Drills
Flexible Steel treats the body as one piece, not a collection of parts — everything is connected. So, we started by trying to get a little more movement at the bottom: in CK’s ankles. I had her stand tall and helped her to balance. She curled her toes under, placed them on the ground and imagined trying to kick the floor with her instep. CK transferred her weight to the “kicking” foot and pumped to increase then decrease the ankle stretch 10 times, then switched to the other foot. We then repeated the process on both feet, changing the direction of the pump to down and toward the outside. The shoulder retest already showed an increase in range and decrease in pain; she was now able to raise her arms so that her hands reached just below nose level.
4) T-Spine Release
Flexible Steel suggests the Bretzel is the ideal next step, but CK simply didn’t have the mobility necessary for that movement. So, we used a regression, the Rib Pull. CK started by lying on her right side, shoulders and hips stacked one on top of the other, with a yoga block to support her head. She bent her left knee and slid it up to above her waist line and held it there against the ground with her right hand. She then tried to make her right heel and the top of her head as far apart as possible. I stood in behind her lower back and braced with my foot and leg to minimize any lumbar movement. CK then reached across her body with her left hand, grabbed her right lower ribs, and rotated to her left, pulling on the ribs and rotating everything (head, neck, ribs) while keeping the right knee on the ground. CK spent some time here, breathing into the movement, working to increase her rotation. Then she did the same on the other side. She stood up and we retested…and you can see not only the increase in range (her hands got to forehead level, with some slight lean back) but the surprise on her face!
5) Internal Shoulder Rotation Stretch
This was a difficult stretch for CK, given her limited range. But we gave it a try: she folded first her left hand back and placed her wrist on her hip. She then squatted while putting her left elbow against the inside of the left knee. CK then used her left knee to push her left elbow toward her right knee, staying there for about 30 seconds while contracting ands relaxing. The she repeated on the right side. When we retested, she was able to raise to the the forehead as before — but without the lean back cheat.
6) Kettlebell Pullover
CK got flat on her back on the floor and extended her arms straight up. I hooked a VERY light (6 kg) kettlebell over both her thumbs so that the base rested against the insides of her forearms. CK locked her elbows, engaged her lats (I encouraged her to think about breaking the bell handle) and slowly lowered the bell back and down toward the ground above her head. She felt pain and started to hunch her shoulders long before reaching the floor. I assisted bringing the bell up and she slowly lowered to her maximum point and hung out breathing there for a bit. We repeated about 10 times, then I took the bell and CK stood up. When we retested she actually got her arms to where there was some daylight visible between her hands and her head. It was also possible to clearly see the point when the worse shoulder (her left) started to reflexively hunch up against the pain and pull her unevenly to the side.
7) Reactive Neuromuscular Training (RNT)
CK stood and prepared to do the baseline test. I positioned myself off to her side, placing one hand on her upper back and the other on the back of her wrists. She raised her arms to max lock-out while I very gently tried to push her back down out of position. After a few seconds I removed my resistance, allowing her to move her arms to her new max, then we repeated until there was no more gain. The baseline retest showed that CK was able to lift her arms above her head, almost uniformly. And of more significance to me, she was able to do it without pain, for the first time in months. I’ve been very happy with the training and progress we’ve made over the years, but I can’t think of anything that made me feel better than CK tearing up in surprise and relief at being able to lift her arms above her head, pain-free. We continue to use the Flexible Steel toolbox, and CK continues to improve.
That’s my Flexible Steel story. I encourage you to invest in yourself and your students by taking the certification. Then you – and your students — can be Flexible Steel.
Lately we have been seeing a lot of people mobilizing the necks by doing head rolls…moving their heads through a complete circle. At Flexible Steel we break these moves apart, in a more isolated fashion, for example, extension and flexion movements, rotations, and lateral tilts. I have asked Dr. Ricardo A. Nieves, M.D. and Flexible Steel Medical Advisor to briefly explain the benefit of practicing or training the neck in this manner as opposed to doing the full circles.
Hi Jon,
Excellent question! The head roll or moving the head through a complete circle is something we see frequently done as a warm up in martial arts.
Athletes are able to compensate and by doing the head roll or circle missed details on their cervical spine range of motion that can eventually create more dysfunction and manifest with pain.
As a trainer you want to find ways of training your clients safely and identify potential problems that might cause pain or injury.
When doing cervical spine or neck range of motion movements I recommend to evaluate and work on movements in a more isolated fashion initially for the following reasons:
– It allows you to identify restriction of range of motion in a particular direction
– It allows you to identify asymmetry on range of motion
– It allows you to identify and isolate a direction of movement that cause pain
– It allows you to identify when during the movement it causes pain (at the beginning, during or at the end of the movement)
– I allows you to avoid placing the neck in positions that cause pain while doing other movements or exercises
– Gives you a more clear and detail baseline movement picture and measurements to compare and re-evaluate after any intervention
– It allows you to communicate effectively and clearly with medical professionals treating you client
I hope this answer your question!
Ricardo A. Nieves, M.D.
Flexible Steel Medical Advisor
Join us for the Flexible Steel Level 1 and 2 Combo in NYC. Click here for more info and a complete schedule.
Flexible Steel Friends – I would like to introduce the 3rd in a 3 part series on the Cossack Squat. This is more than a few quick tips, rather it is an intensive and impressive premier on this very beneficial move designed to make you both Strong and Flexible at the same time. The author is Piort Kowalik, Flexible Steel Instructor Specialist (FSIS) from Poland. Follow Piort’s advice and you too will become like Flexible Steel!If you missed Part 1 and part 2 go here first http://flexiblesteel.com/blog/2017/07/13/cossack-squat-part-1/
Don’t train (load) an incorrect movement pattern
Before you decide to add the Cossack Squat to your training repertoire, make sure it’s good enough to grab a kettlebell and start the reinforcement process. Because movement is a little like working with clay, if you put unfinished, misshapen pot in the oven, you can be certain that only a harder version of this unfinished pot will come out. Such pot won’t be displayed anywhere, and will be of no use, and you will no longer be able to reshape it. You can only add it to the museum of bad pots.
If you try working a bad movement with weights it will not only be unsafe, but it will also be difficult to correct the bad movement strongly embedded in the nervous system. Give yourself time, take my advice and spend additional month working on the correct Cossack squat. You can use the framework I had tested on myself. Here it is:
Flexible Steel 4 weeks to Cossack Squat
Because I am not sure which of the problems in the Cossack squat that I’ve mentioned plagues you, I propose this solution. We have 6 items regarding mistakes and problems. Each contains 2-4 exercises, which should help. For each item choose only 2 exercises – Exercise A and Exercise B. 6 problems times 2 exercises each gives you 12 exercises and these exercises will accompany us for the next 4 weeks of work on a relatively correct Cossack Squat.
I’ve chosen mine, now you have to choose yours. You can choose the same, but remember that my problems may be different from yours, because every one of us has different experiences and different sport background, different rate of regeneration, etc. I give you mine so that you will see how it looks in practice.
The hip moves outside the heel on the bent leg side
Ex. A – STRADDLE
Ex. B – GROUND COSSACK
The heel of the bent leg does not touch the floor and you can’t press down on it.
Ex. A – ANKLE CIRCLES
Ex. B – NARROW SQUATS
Torso is not vertical.
Ex. A – KB GOBLET SQUAT
Ex. B – WALL COSSACK
The knee of the bent leg caves in.
Ex. A – BACK COSSACK
Ex. B – SPLIT SWITCH
5.(MA Cossack) The outer edge of the foot of the straight leg is not touching the ground.
Ex. A – SIDE CALF STRETCH
Ex. B – KUNG FU STANCE
The height of the position is wrong – hips are higher than the knee on the bent leg side.
Ex. A – PINK PANTHER THE KNEE
Ex. B – LOADED COSSACK
Now that we have chosen our 12 exercises for the next 4 weeks, the next step is to arrange them in the template below. This template is a simple protocol I created for myself, which I use to train three times a week. The H, M and L letters stand for the difficulty level and are accordingly High, Medium and Low. The high difficulty version is 5 sets for 5-10 reps of a given exercise in total or per side, Medium is 3 sets for 5-7 reps and Low is 2 sets for 3-5 reps. Numbers from 1 to 6 mark the mistakes and problems we listed before. All this may seem a bit unclear at first, but once you put everything in order you’ll see it makes sense. So here’s the template. Here you should put the exercises that you’ve chosen.
Remember that week 1 and 2 differ from week 3 and 4 when it comes to the order of the exercises – A – B for 1 and 2; B – A for 3 and 4. To show how this may look I’ve put my exercises into week 1 with the values corresponding to high, medium and low versions. This what is looks like now:
Remember to match the number of reps to the difficulty level. The range between 5 to 10 gives you a lot of space to maneuver, so that depending on the exercise or your current condition you can choose a lower or greater number. Just choose what feels easy and what feels hard for you. Don’t rush it, and don’t beat yourself up, give yourself enough time to rest and treat each exercise as practice not training for exhaustion. Also try not to exceed the pain barrier, but rather gently approach it by working very close to your discomfort zone. Remember – it should be challenging, but not a struggle. Follow this simple program for 4 weeks to the letter and you will not be disappointed! I’m rooting for you. I hope that when I come back with a proposal on how to build strength using the Cossack squat you’ll be ready for it! And remember… Be Both Strong And Flexible – Become Flexible Steel.
PIOTR KOWALIK
The founder and manager of the Sports Centre and School of Martial Arts “IRBIS” in Krakow. The coach and trainer of gold medalists in the Polish Wushu Championships.
The instructor of StrongFirst SFG1 and Flexible Steel Instructor Specialist, who can share his expertise with passion during training sessions in the Kettlebell Centre Krakow and during all the other trainings in Krakow and all around Poland.
Apart from teaching how to build strength and flexibility based on such tools as kettlebells, he teaches Chinese Martial Arts – Kung Fu that he has been practicing since a child.
He started the training of Chinese martial arts in 1991. For years he has been one of the most title-winning Kung Fu (Wushu) competitors in Poland. He teaches both traditional and sports varieties. He holds the title of the World Champion won at the World Championships in 2004 in Chile and in 2006 in China.
He was awarded with the Prize of the Minister of Sports and Tourism of the Republic of Poland for winning gold and silver medals at the World Traditional Wushu Competitions in China in 2010. He was awarded with a prestigious title of the “Best Competitor of 2006” by the American Federation of Chinese Kuoshu in Baltimore, USA.
Check out our new DVD Flexible Steel Fundamentals. Get your copy here today and say goodbye to stiff creaky joints and an inflexible body.
Flexible Steel Friends – I would like to introduce the 2nd in a 3 part series on the Cossack Squat. This is more than a few quick tips, rather it is an intensive and impressive premier on this very beneficial move designed to make you both Strong and Flexible at the same time. The author is Piort Kowalik, Flexible Steel Instructor Specialist (FSIS) from Poland. Follow Piort’s advice and you too will become like Flexible Steel!If you missed Part 1 go here first http://flexiblesteel.com/blog/2017/07/13/cossack-squat-part-1/
Jon Engum
COSSACK SQUAT –
PART 2 More Troubleshooting Tips
Common Problems and Solutions:
Torso is not vertical.
As long as we train the Cossack squat without any weights, there’s no problem with having a rounded back. In martial arts training I teach the position to beginners where they have their hands resting comfortably on the floor. We need this because in order for the leg sweep to the back we need the MA Cossack squat position. During this attack hands touch the floor. However, martial arts follow their own specific rules and it does not mean that martial artists should not learn other versions.
Each position or movement pattern should be taught correctly first, and then loaded as part of the training. But if we want to load the Cossack squat we need to be sure that our back is safe. That is why the correct version, just like the normal squat, requires vertical or near vertical back so that the center of gravity is more less in the middle of the foot. Before you load the Cossack squat you need to be capable of reaching and maintaining vertical torso without any additional weight. Learn this position and train it correctly from the beginning.
If any problems occur, try this:
KETTLEBELL GOBLET SQUAT
The bell held during the squat will give you the correct feeling of maintaining vertical body. Retracted and packed shoulders and an open proud chest in the squat will transfer directly onto the Cossack squat. Learn how to keep stable core and back in this exercise before you move on to the Cossack squat. Every Flexible Steel instructor will teach you how to perform this awesome squat variant correctly. You can find this exercise in the “Untying the Four Knots” program by Jon Engum – for the instructions on how to do the Goblet Squat go to http://flexiblesteel.com/blog/2016/12/27/four-week-program-to-flexible-steel/
PARTNER COSSACK or hold on tight
You can find a very detailed description of this version in the Certified Flexible Steel Instructor’s manual. Find an instructor or join us. To put things simply – grab a partner and sit comfortably in the correct position to teach the nervous system the correct position and to “stretch” everything our body is lacking and to keep the vertical alignment.
Trust your partner. They’re there to allow you to “lean back” to achieve the vertical position. Remember that buttocks should be close to the heel/floor. I’ve seen many people who, even when they were being held by their hand, pushed their butt back trying to get the hip hinge pattern. But what you’re looking for is the squat pattern. Lack of trust also means locked body, which resists its owner. Such body will not yield satisfying results. You should relax and trust your partner. This drill really works, for poor ankle mobility as well – just relax and let your own weight work the joint.
A couple of hints: The arm on the bent knee side should be free. Use it to push your knee out and open the hips. Instead of a partner you can use TRX or even the door (grab the handle) – BE CREATIVE.
COSSACK GOBLET HOLD – mix kettlebell squat with the Cossack when you don’t have a partner around.
Grab the bell like in the Goblet Squat, but instead go down to the Cossack squat position. When you feel you’re falling back push the weight away from your body. BE CAREFUL – holding the weight tightly to your chest can easily make you lean forward and you want to avoid that. Elbows supported on your ribcage will help you hold the bell without the arms getting to tired. Think about keeping your back straight, staying vertical, holding a proud chest and pushing your knees out – it has to be perfect!
WALL COSSACK – facing the wall
Our body is looking for a way out and it usually finds one. The problem is that our body prioritizes ways to save energy over ways to spend it. It’s lazy, and you’re trying to kill it. Play a trick on your body and place it as close as possible to a wall. Now go down to a Cossack squat. There’s no room to lean forward and an empty space behind you. You have to hold on. This position reveals all weak spots in mobility. The brain will simply end the downward motion once our limitations come in to play. At least now you can see all those weak spots – Work on your mobility especially since now you know what the problem is.
The knee of the bent leg caves in.
This mistake will haunt people who also have problems squatting. Of course the problem may also result from incorrect squat pattern and in this case contacting a FS instructor wouldn’t hurt. However, in most cases problems with squats and Cossack squats are a result of short range of motion in the hips. It may result in the knees caving in, which makes working on squats and Cossack squat more difficult and dangerous. Loading such pattern is not advised. Before we add weight we need to improve the movement. I propose
PRYING GOBLET SQUAT
The way to improve vertical position described above should become one of your favorite exercises, but if you put your elbows on the inside of your knees and let the bell spread its weight equally between your legs prying the knees out, you get a great way to work on opening your hips. In the lowest point of the squat add slow but strong rotations with your entire body to the right and the left also make figure 8s with your knees.
A great exercise which has recently been introduced to the Level I Flexible Steel Certification which will help your straddle, mobilize and open your hips and since it looks like a Cossack squat with your back on the ground it is a fantastic way to improve it. Even though you’re lying down, it’s far from relaxing. More flexible people will probably try to load the leg, but even the basic version is quite challenging. Do 5 rounds where 1 round is 10-20 forceful reps where you enter/exit the deep ROM with a one second hold at the lowest point and 10-20 seconds of waiting and pushing into the deepest range of motion. A bonus variation is a full circle with the straight leg – down over the ground then up to the vertical position and again to the side just over the ground deep into the maximal ROM. Remember that at no point the leg should drop below the belt level (except for the circles) and if it does simply pull it up above the belt level. Good news and bad news – don’t forget the other leg, unless you want to walk crooked. 🙂
SPLIT SWITCH
Great movement drill that will get you closed to do the full split. However, without the knowledge of certified FS instructors you are more likely to risk an injury that is why I implore you to find an instructor near you. You can also read the short description of the Three S rule that Jon described on his blog here: http://flexiblesteel.com/blog/2017/03/14/grow-the-points-of-your-triangle and avoid any injuries while pursuing the split. But to get a beautiful Cossack squat a much higher version will be just fine. It’s about mobilizing the hips – lift yourself up on your arms placed on e.g. chairs. Imagine that your hips are like headlights in a car that are illuminating the road ahead. Assume high front split position and shine the headlight on the leg in front (rotate the body and the back leg). Now without moving your legs rotate completely to the back leg shining the headlight straight to the foot. Each time support yourself on your arms for safety. This exercise resembles another one dubbed “the Egyptian.” However the Egyptian is an exercise for shoulder mobility not the hips, right? Yep, that is why this is called the Split Switch.
DOWEL PARTY or playing with a stick
When I was doing this exercise for the first time it instantly reminded me of a party game you play with your friends at house parties. You definitely know which, the one where you have to walk below a bar or a stick placed at a certain height. Facing it upfront you have to walk below arching like Neo in the Matrix. Each successful pass means the bar is going lower and lower. Of course the version in the game is great and can help us to master the gymnastic bridge or its progression, but the Flexible Steel exercise, which you can see in the video below, will help you in the Cossack squat thus improving your squat and few elements of your get up.
Our task here is not about arching back – stand sideways to the stick that is located at your shoulder height to your right. Then slide your right leg to the side under the stick, put your feet with your toes pointed outward and push your knees out, so they point to the same direction as your toes. Use your strength to keep pushing your knees out. Now without moving your fingers back or forth lower yourself and slowly shift your weight to the right below the stick. Go up once you’re on the other side. Easy right? Repeat couple of times, to make sure you’re doing it right. Another step behind you. New one just ahead. And then another one. I prefer to start from an easy height and in 3-4 rounds lower the stick to the middle of my arm, then my elbow until I reach my hip. Of course the lower it is the harder it gets. In the lowest variant you’re performing a beautiful Cossack with your feet glued to the ground transferring your bodyweight so low that without proper “greasing” of the hips on the previous levels it’s easy to fail. At this level it’s simple, but far from easy.
(MA Cossack) The outer edge of the foot of the straight leg is not touching the ground.
Remember when I talked about the Cossack in martial arts – both feet planted on the floor. You should be able to do that! But there’s one catch. The outer edge of the foot of the straight leg is not touching the ground. Some will say that’s unimportant because you should maintain neutral ankle position, but it’s not an excuse for me. If you don’t have sufficiently stretched outside part of your calf, you’ll look for any theory to justify your lack of flexibility. It’s like the idea that mastery in martial arts does not require any leg flexibility – hands hit the head and legs kick below the stomach. This is kind of a stretch for me. If you want to be better in whatever you do, work on your weak points until they become your strengths.
KUNG FU STANCE
My students, whom I teach Choy Lee Fut Kung Fu, can do a pretty decent Cossack squat in a very short time from their first training. But we never stay there for more than just a few reps during warm up while doing basic mobility and flexibility block of our training. So where did this result came from. Positions used in Kung Fu. We have the two most basic positions – Sei Ping Ma (Horse Stance) and Den Jing Ma (Bow Stance). Both require strong and stable legs as well as hips that can open fully.
On these pictures we can see how they look. Please disregard the hand position, we’re not praying here. Bow stance is a rotation of the entire torso either left or right while extending the back leg and pushing the heel on that leg back. The foot is glued to the floor and this actually translates wonderfully onto the MA Cossack squat. Perform several transfers from the Horse stance to the Bow stance in both directions. Make sure that your thighs are lateral to the floor and that while rotating to another position you’re pressing the outside edge of the foot into the ground like you should in the MA Cossack squat. You can also stand by the wall and push yourself away from it as you press on your heel into the ground in time elongating the position and thus changing the angle and making it more difficult. You have to experiment and see what works best. Approach this exercise with caution and you’ll see interesting results in a very short time.
SIDE CALF STRETCH
I really like this simple exercise. Sit on the floor with your arms behind you. Slightly lift your right leg and grab it with your left hand. with your left hand. Remember one thing – you want to grab the foot holding it from the planter side to the outside of the foot. The hand is holding the foot closer to the toes rather than the heel. Now slowly start extending your leg by delicately rotating the edge of the foot in dorsiflexion forward. Stay in this position for a few moments.
BENT LEG ELEVATED or MA Cossack with bent leg elevatedThis task is similar to the HEEL UP exercise described above. The difference is that the entire foot is elevated and you should press it down into the floor like in the MA Cossack. Give your body time to find the right position, work on the MA Cossack with slight elevation allowing you to do it as correctly as possible. With time lower the elevation. This method also allows you to easily track your progress.
The height of the position is wrong – hips are higher than the knee on the bent leg side.
If you remember Cossack squat is a squat where one leg is extended to the side and the toes are pointed up. If this is the case the standard for me is for the hip to be at or below parallel. Until we are able to go lower there’s no point in talking about correct or full Cossack squat. Work on a deep squat and the deep Cossack squat will just be a matter of time. I recommend you do the following:
PINK PANTHER THE KNEE or how to get your knee higher
During the instructor certification Jon Engum teaches this technique in the context of high kick for fighters. I started to apply this technique to achieve better, deeper and more relaxed squats. It can work wonders. I’ll quote the Flexible Steel Instructor’s manual.
“Stand with your back against a wall for balance. Lift your knee as high as you can and have your partner hold it there (.) Now your partner will place his right hand on top of your right knee and give you some downward resistance. As you try to lift your knee, without warning your partner removes the resistance and follows your knee up with the supporting left arm. Repeat until you can no longer make upward progress.”
This drill is not easy and requires skilled training or help from an FS instructor. I definitely recommend participating in the course.
LOADED COSSACK – load the Cossack with a kettlebell
My hierarchy of methods for building flexibility looks as follows: relaxed stretching, power stretching (isometric tension-relaxation), loaded stretching. There’s no point in loading the split or the Cossack squat if there’s still a lot of elements requiring improvement, and definitely not if it’s not deep and far from perfect form. A person with such problems should work more on basic flexibility before moving to this version. But if you’re just an inch away from perfect and just holding the position won’t do much for you – grab a kettlebell. Why a kettlebell? Because it offers a couple interesting choices for holding it. You can grab it like in a goblet squat; you can hold one or two in the rack position like in the KB front squat. Flexible Steel is a system created by Master Instructor of StrongFirst strength training system – and it includes kettlebells, barbells and bodyweight training. So now you know why you should grab a kettlebell?
To be continued: Check back next week for Part 3 of this 3 part series! How to program the Cossack.
PIOTR KOWALIK
The founder and manager of the Sports Centre and School of Martial Arts “IRBIS” in Krakow. The coach and trainer of gold medallists in the Polish Wushu Championships.
The instructor of StrongFirst SFG1 and Flexible Steel Instructor Specialist, who can share his expertise with passion during training sessions in the Kettlebell Centre Krakow and during all the other trainings in Krakow and all around Poland.
Apart from teaching how to build strength and flexibility based on such tools as kettlebells, he teaches Chinese Martial Arts – Kung Fu that he has been practising since a child.
He started the training of Chinese martial arts in 1991. For years he has been one of the most title-winning Kung Fu (Wushu) competitors in Poland. He teaches both traditional and sports varieties. He holds the title of the World Champion won at the World Championships in 2004 in Chile and in 2006 in China.
He was awarded with the Prize of the Minister of Sports and Tourism of the Republic of Poland for winning gold and silver medals at the World Traditional Wushu Competitions in China in 2010. He was awarded with a prestigious title of the “Best Competitor of 2006” by the American Federation of Chinese Kuoshu in Baltimore, USA.
Flexible Steel Friends – I would like to introduce the 1st in a 3 part series on the Cossack Squat. This is more than a few quick tips, rather it is an intensive and impressive premier on this very beneficial move designed to make you both Strong and Flexible at the same time. The author is Piort Kowalik, Flexible Steel Instructor Specialist (FSIS) from Poland. Follow Piort’s advice and you too will become like Flexible Steel! Jon Engum
COSSACK SQUAT – strength, mobility and flexibility all in one – PART 1
You should be fit, you should be strong, you should also be flexible and you should not have any problems achieving full or even greater than full range of motion in every joint of your body. Can you? Great. But can you maintain full control? Can you maintain perfect harmony?
Not everyone who is strong is also well coordinated and flexible. Just as not everyone who is flexible is well coordinated and strong. And definitely not everyone who is well coordinated will also be strong and flexible.
Each of these traits can work without the others, but their impact on one another cannot be overstated. Just look how strength increases with a fully controlled movement thanks to perfect coordination. Now see how a full range of motion will remove any obstacles from this well coordinated strength. This is the goal of one following the idea of Flexible Steel.
Let’s take a closer look at these traits. Flexibility without control and strength is simply unsafe, and coordination without strength and range of motion does not have space to maneuver.
You know you’re strong. Your movement is well coordinated and you can manage it however you want at a high level. Your flexibility is also a thing of envy. Now check if you can make use of all these things at once. This isn’t as easy as it may seem. There are people who are strong, but put them in an “awkward position” and they won’t be able to switch their strength on and use it. When performing complex movements, where each limb is doing a different thing or holds different position at the same time and where we are unable to control it by watching it, is another level for working on strength, flexibility and mobility. Work on this and be Flexible Steel.
Goals:
We want to aim high and reach far. When we undertake an activity we naturally want to get good at it. I mean, that’s what it’s all about. When beginning a new thing no one wants to be average at it and achieve nothing. And that’s great, however, there is one small problem at this stage – the fact is that many beginners (regardless of the discipline) as soon as they learn basic principles already aim for the highest peak. Many are not interested in the road that leads to it, and that road or path can be interesting – even though sometimes it may be uneventful it is still necessary to travel on it. On our road to the highest peak we often find many beautiful “viewpoints” which should also interest us.
One of the methods, which have helped me achieve my own difficult training goals, is the little step rule. Every distant dream can (and should) be made closer by setting a number of smaller goals that we will meet “on the way.” These goals can and often will have their own sets of smaller goals.
Here’s how I do it:
You take something you want to achieve, a very distant goal. You come up with 3 steps, which you have to achieve to get there. Arrange them from the easiest to the hardest. Then you come up with 3 steps necessary to achieve each of those steps and you arrange them like before.
For example let’s assume your goal is the split. Sure, you can just start doing splits, even if there’s two feet between you and the ground, but it’ll look a little bit different according to the method that I use. Because the split is not simply about flexibility but also hip mobility – my first step is an exercise, which mobilizes, lower half of the body – the squat. But I don’t want my split to be a position that I can’t get out off. I want to be able to almost jump to straight legs from it. I think I’d need a little bit of strength for that. What will strengthen my lower body and stomach?
The squat!
So I’ve chosen correctly – Step 1 is Squat training.
Since my last step is the split, what then will I need on the way? My choice for the Step 2 is the exercise by the name of Cossack Squat. Why? Because it is a squat with one leg straightened out to the side – getting us that much closer to the split. And since that is my ultimate goal and I already have the squat and the Cossack squat added to my road – two exercises where the first includes a lot of mobility and the other mobility and some flexibility, then the next logical step would be to add some flexibility. What exercises would add more of that? I’ll think about it when I’m dividing this step into 3 smaller ones. For now this plan will suffice.
Goal – The Split
Step 1 – Squat training
Step 2 – Cossack Squat training
Step 3 – Training for increased flexibility for the split
In this article I would like to write in more detail about the Cossack squat. If you’re at the level where your squat could still be improved or you’ve just started learning it, I suggest you find yourself a Flexible Steel Instructor, who will know what strategy to use in order to teach you this basic movement pattern (possibly anew), and then how to load it, in this correct pattern, using kettlebells or barbells. To set 3 (or possibly more) steps might too difficult for you that is why you should refer to a qualified instructor.
Learning the Cossack squat is similar and you should see this article as an encouragement, find a Flexible Steel instructor in your area and work together to build a strong foundation for splits. This foundation should be the Cossack Squat.
How to perform a correct Cossack Squat.
The Cossack squat is but a deep squat with one leg to the side. Because this position is asymmetrical you should practice it on both sides. The torso should be vertical with a proud open chest and packed and retracted shoulders. The top of the head should reach as high as possible towards the ceiling constantly “growing.” The knee of the bent leg is in a position similar to a normal squat – opening to the side, toes and knee face the same direction (don’t let the knee cave in!). The other leg is straight, knee locked, and the ankle is in dorsiflexion so that the toes are pointed upwards. In this position, the weight should be distributed on both heels.
My martial arts background lets me add one more position, which can serve as a step on the road to the split. It’s the Cossack Squat with two feet flat on the floor. Contrary to the toes up version the Martial Arts Cossack squat requires the whole foot to be flat with the outer edge of the foot pressing on the floor.
Cossack squat is not an easy position, although some will find it not to be too difficult. It demands stable and braced torso, full range of motion in the hips, knees and ankles, as well as enough flexibility in the adductor magnus muscles. During group Flexible Steel classes in my school, it is clear that people training martial arts on daily basis had little difficulty to get into this position. Most of them assumed correct position straight after hearing the instruction. The Martial Arts students had some difficulty with correct squats, but after a while it improved significantly. The students who just studied kettlebells had problems to get into the Cossack Squat and maintaining correct movement patterns. Our kicking fighters have no problems with leg flexibility, but the kettlebell students required more attention.
Despite of your sport background and whether the Cossack position is hard for you or not, always make sure you’re not making any of the following mistakes:
The hip moves outside the heel on the bent leg side
The heel of the bent leg does not touch the floor and you can’t press down on it.
Torso is not vertical.
The knee of the bent leg caves in.
(MA Cossack) The outer edge of the foot of the straight leg is not touching the ground.
The height of the position is wrong – hips are higher than the knee on the bent leg side.
On the road to get a good Cossack squat you may find few challenges and based on them create new “steps” achieving which will not only help you find correct position, but will also allow you to build strength in this position, not to mention that it will get you shockingly close to achieving the split. Build strength based on training using your own bodyweight. This will allow you to load the position with a kettlebell and enter a new level of building total body strength by doing squats, switches and presses. But… first things first.
Troubleshooting the Cossack Squat.
1.The hip moves outside the heel on the bent leg side
This happens often when the range of our straddle is small. Poor flexibility of the adductors will limit our progress. Let’s deal with it first.
STRADDLE
The straddle includes many moves each of them works our muscles a bit differently stretching them for a wider straddle. Reach forward or to both your feet, remembering the Three S principle (you’ll learn more about it on Flexible Steel Instructor Certification Level 1 and 2 or by working with a certified FS instructor).
Remember whenever your legs seem to get used to a stretch try doing it a bit further and wider. The wider you go the easier it will become to reach forward and to the sides. Always try to maintain a neutral spine.
The video below presents a method to gradually reach forward, which I often use in my classes (P.S. For beginners it will be enough to just sit in the straddle position and try to relax.)
SIDE SPLIT
A logical consequence of a straddle taken far enough is its vertical variant where gravity aids us in the stretch. By the split we don’t necessarily mean its final version where we’re sitting flat on the ground. Especially since our main problem is poor adductor flexibility.
However this position of the body will bring us additional benefits. When we limit our range of motion by tensing the muscles to prevent sliding apart into the split, we learn how to control entering and exiting this range of motion. Use different versions of hand support, holding on to an object in front of you, hanging by something fixed above your head or by just holding the position while tightly flexing the muscles.
Always exercise common sense and never act thoughtlessly, because any potential injury can delay any progress for weeks or even months. Work smart and preferably with the assistance of a Flexible Steel instructor.
GROUND COSSACK or a Tactical Frog with your leg straight
Tactical Frog is a great exercise which can work wonders. You can learn about it’s potential during the Flexible Steel Certification. This exercise “attacks” our weak points and depending on what we need the frog gets the job done. It looks inconspicuous and at a first glance even funny, but spend a couple of minutes in this position and you’ll stop laughing, and after several more sets like that you’ll be shocked just how much the frog improved your squat, your straddle and your Cossack squat.
In the frog position just straighten out one leg to the side and all of a sudden you are in the Cossack squat position, but in a slightly different relation to the floor. By moving back and forth you enter the ROM that builds the flexibility of the entire back of our legs. When the toes are pointed to the front you will feel a deep stretch on the inside of your thighs, and when you point the toes up at the same time touching your buttocks to the floor and lifting the torso to a vertical position you will feel that pleasant sensation of your muscles being stretched on the bottom part of your thigh. Don’t be afraid to reach your torso towards the straight leg in this position, if you want.
PARTNER HIP BLOCK or blocking the hip from going to the side
This corrective exercise is perfect for people who have no clue what I mean when I say that the hip should not go to the side in the Cossack position. I’ve noticed in my students that many beginners compensate lack of flexibility in the adductors by this maneuver. Explaining wasn’t enough. Even though I did my best to come up with the most imaginative descriptions my adepts simply did not catch my vibe. Moreover, they were convinced that their position was correct. Only when I blocked their hip from going to the side (by simply blocking it with my leg) it hit them – the range of motion down ended at the knee, and the strong pull of non-flexible legs made it impossible to go deeper/wider.
This drill is useful when you need to re-teach the movement pattern. You can do it with another partner who holds your hand preventing you from falling back.
The heel of the bent leg does not touch the floor and you can’t press down on it.
If your range of motion in the ankle is clearly limited it will significantly affect your squat and its different versions like the pistol or the Cossack squat. In this situation the body has two ways out: either fall over on the back or find some other way to maintain vertical torso. The two most common compensation are toe abduction to the outside with simultaneous loading of the inside of the foot leading to flattening of the medial arch of the foot. Such compensation is hazardous and leads to problems with your knee and hip. Another compensation is more popular with the Cossack squat – heel leaving the floor resulting in decreased dorsiflexion of the ankle.
If you don’t want to have any movement restrictions in your ankle just move it in many different ways as often as possible. Working your ankle doesn’t require a gym. You can make circles with your foot in your full ROM throughout the entire day. Myself, I often stand on a stair so that the heel drops below the step and just hold it. It might be worth checking whether we’re not being held back by our calves, plantar muscles or shin muscles, if we massage them the right way it will improve our movement.
We have many great mobility drills in stock for that. Not all of them are equally effective for all people, that is why you always have to check, test, practice and test again. For example, you can do the following exercises:
STRANGE WALKING – mobility drill for the ankle presented by Master SFG Fabio Zonin during a remarkable StrongFirst Bodyweight seminar.
This drill always gets few laughs, because it looks really strange and some might not take it seriously. However the results can bring a different smile together with surprise.
TEST YOUR COSSACK
THEN:
Walk the distance of 60-90 feet this way:
A) on your toes; B) on your heels; C) on the outside edges of your feet; D) on the inside edges of your feet; E) with your toes completely abducted to the outside; F) with your toes completely adducted to the inside;
Retest.
While walking this way try to keep your knees locked, also try to forcefully press down on each of the feet positions while walking. And? Did it work?
ANKLE CIRCLES
It’s an exercise from FMS/GFM arsenal and is one of my personal favorites for ankle mobility. Just grab the top of your foot with your hand and hold the heel of the other foot so it doesn’t leave the floor. Push your knee forcefully towards the second toe. When you reach the end push further, but this time slightly to the outside towards the little toe and come back with a circular motion to the starting point. A dozen circles or so on both feet for couple sets and your ROM should be significantly increased.
Small hint: If I am holding my foot with my right arm from the top and pushing the heel down with left, my right hand is located on the inside of my right thigh. In this position I am not impeding my own movement and I am making sure that the knee does not cave in. Notice how your hips are positioned in relation to the entire foot. There’s no need to put them outside in a strange contortion.
NARROW SQUATS (SLOOOOOWLY)
This is an exercise that will not only test your ankle’s range of motion, but also load it and thus reinforce the new ROM. A very slow version will add the twist at the end of the punch and build strong core, hips, knees and ankles. You will find more details on this in Flexible Steel Instructor Mark Cheng’s articles and his training programs.
Remember to keep your ankles and knees together throughout the movement. Give yourself some time and do the exercise at a speed that will allow you to go to the very bottom after 30 seconds and take the same amount of time going up. Why do something fast, if you can’t do it slow?
HEEL UP – Cossack squat with elevated heel
Perhaps your ankle needs more time that is why you should be learning the correct body position with perfectly straight and vertical back today. Put something under your heel, nothing big, just enough to make you stable so that you don’t feel like you’re going to fall back, at the same time low enough that you need to use force to pull your feet up.
Such work teaches you the position and allows the body and the nervous system to accept this set up as safe. And we know too well that when the nervous system is no longer getting the danger message, magic happens.
Using this method of correction we teach the student to maintain vertical torso, which is another item on our list – add this drill as another correction specifically for troubles to maintain vertical position in the Cossack squat.
To be continued: Check back next week for Part 2 of this 3 part series!
PIOTR KOWALIK
The founder and manager of the Sports Centre and School of Martial Arts “IRBIS” in Krakow. The coach and trainer of gold medallists in the Polish Wushu Championships.
The instructor of StrongFirst SFG1 and Flexible Steel Instructor Specialist, who can share his expertise with passion during training sessions in the Kettlebell Centre Krakow and during all the other trainings in Krakow and all around Poland.
Apart from teaching how to build strength and flexibility based on such tools as kettlebells, he teaches Chinese Martial Arts – Kung Fu that he has been practising since a child.
He started the training of Chinese martial arts in 1991. For years he has been one of the most title-winning Kung Fu (Wushu) competitors in Poland. He teaches both traditional and sports varieties. He holds the title of the World Champion won at the World Championships in 2004 in Chile and in 2006 in China.
He was awarded with the Prize of the Minister of Sports and Tourism of the Republic of Poland for winning gold and silver medals at the World Traditional Wushu Competitions in China in 2010. He was awarded with a prestigious title of the “Best Competitor of 2006” by the American Federation of Chinese Kuoshu in Baltimore, USA.
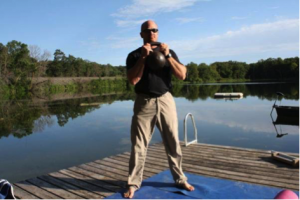
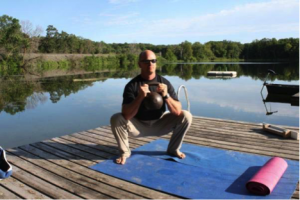
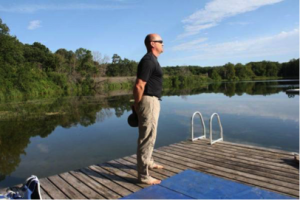
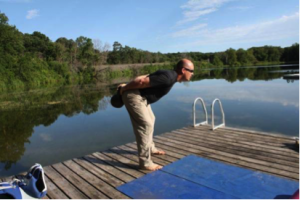

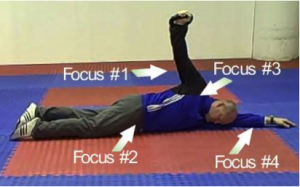
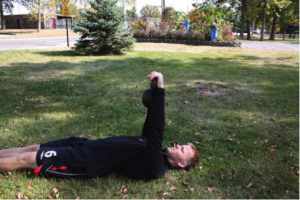
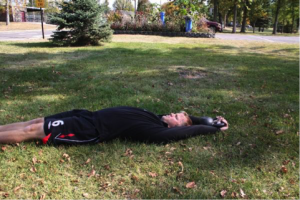
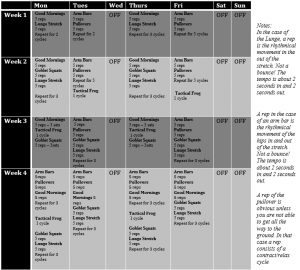
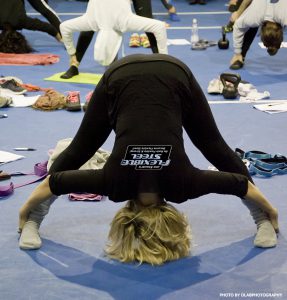

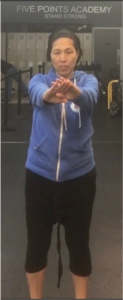
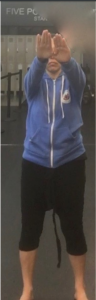
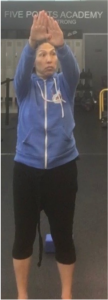
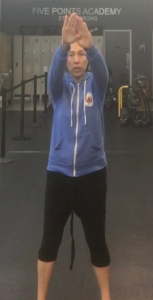
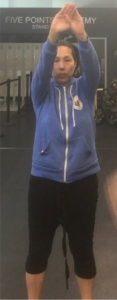
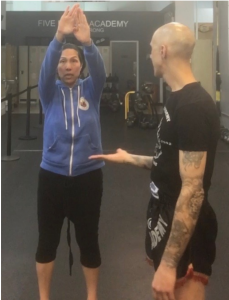

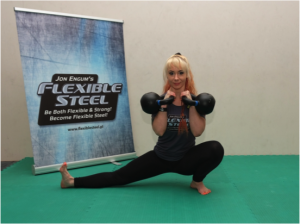
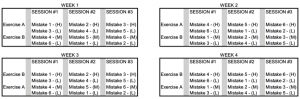
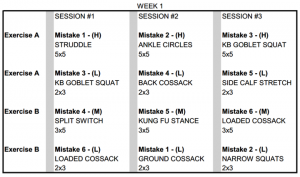
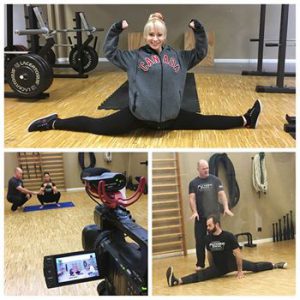
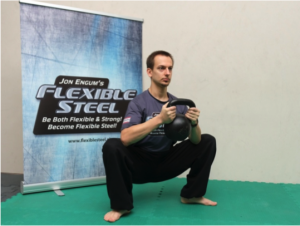 vertical body. Retracted and packed shoulders and an open proud chest in the squat will transfer directly onto the Cossack squat. Learn how to keep stable core and back in this exercise before you move on to the Cossack squat. Every Flexible Steel instructor will teach you how to perform this awesome squat variant correctly. You can find this exercise in the “Untying the Four Knots” program by Jon Engum – for the instructions on how to do the Goblet Squat go to
 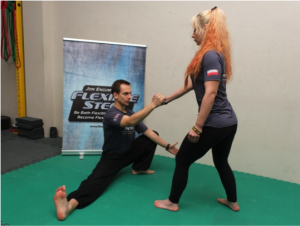 I’ve seen many people who, even when they were being held by their hand, pushed their butt back trying to get the hip hinge pattern. But what you’re looking for is the squat pattern. Lack of trust also means locked body, which resists its owner. Such body will not yield satisfying results. You should relax and trust your partner. This drill really works, for poor ankle mobility as well – just relax and let your own weight work the joint.
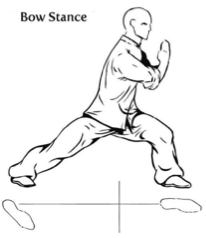
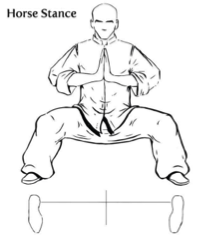
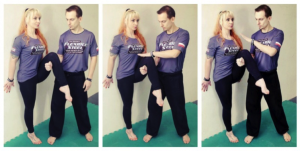
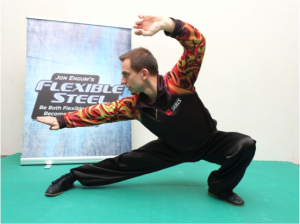
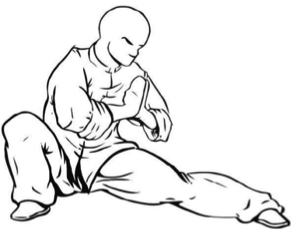 My martial arts background lets me add one more position, which can serve as a step on the road to the split. It’s the Cossack Squat with two feet flat on the floor. Contrary to the toes up version the Martial Arts Cossack squat requires the whole foot to be flat with the outer edge of the foot pressing on the floor.
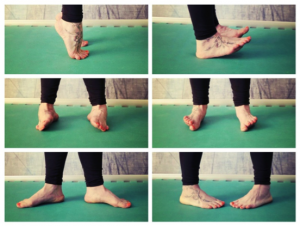 A) on your toes; B) on your heels; C) on the outside edges of your feet; D) on the inside edges of your feet; E) with your toes completely abducted to the outside; F) with your toes completely adducted to the inside;
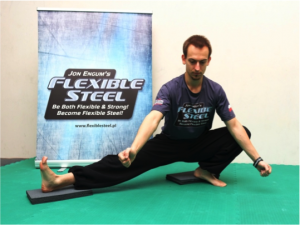 correct body position with perfectly straight and vertical back today. Put something under your heel, nothing big, just enough to make you stable so that you don’t feel like you’re going to fall back, at the same time low enough that you need to use force to pull your feet up.